All in One View
Content from Introduction
Last updated on 2026-07-15 | Edit this page
Estimated time: 10 minutes
Overview
Questions
- What do I do when I need to make complex decisions with my git repository?
- How do I collaborate on a software project with others?
Objectives
- Understand the range of functionality that exists in git.
- Understand the different challenges that arise with collaborative projects.
Introduction
Version control systems are a way to keep track of changes in text-based documents. We start with a base version of the document and then record the changes you make each step of the way. You can think of it as a recording of your progress: you can rewind to start at the base document and play back each change you made, eventually arriving at your more recent version.
The git version control system, used to manage the code in many millions of software projects, is one of the most widely adopted one. It uses a distributed version control model (the “beautiful graph theory tree model”), meaning that there is no single central repository of code. Instead, users share code back and forth to synchronize their repositories, and it is up to each project to define processes and procedures for managing the flow of changes into a stable software product.
Challenges
Git is powerful and flexible to fit a wide range of use cases and workflows from simple projects written by a single contributor to projects that are millions of lines and have hundreds of co-authors. Furthermore, it does a task that is quite complex. As a result, many users may find it challenging to navigate this complexity. While committing and sharing changes is fairly straightforward, for instance, but recovering from situations such as accidental commits, pushes or bad merges is difficult without a solid understanding of the rather large and complex conceptual model. Case in point, three of the top five highest voted questions on Stack Overflow are questions about how to carry out relatively simple tasks: undoing the last commit, changing the last commit message, and deleting a remote branch.
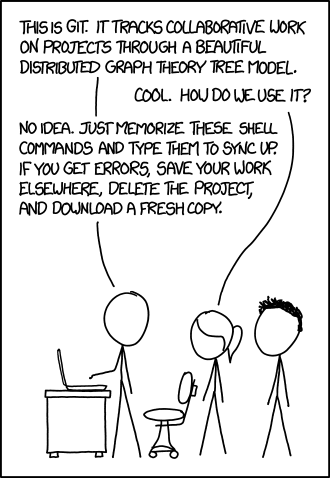
Mouse-over text: If that doesn’t fix it, git.txt contains the phone number of a friend of mine who understands git. Just wait through a few minutes of ‘It’s really pretty simple, just think of branches as…’ and eventually you’ll learn the commands that will fix everything.
With this lesson our goal is to give a you a more in-depth understanding of the conceptual model of git, to guide you through increasingly complex workflows and to give you the confidence to participate in larger projects.
Review of Intro Git Commands
First, lets review the concepts and commands that constitute the basic git workflow.
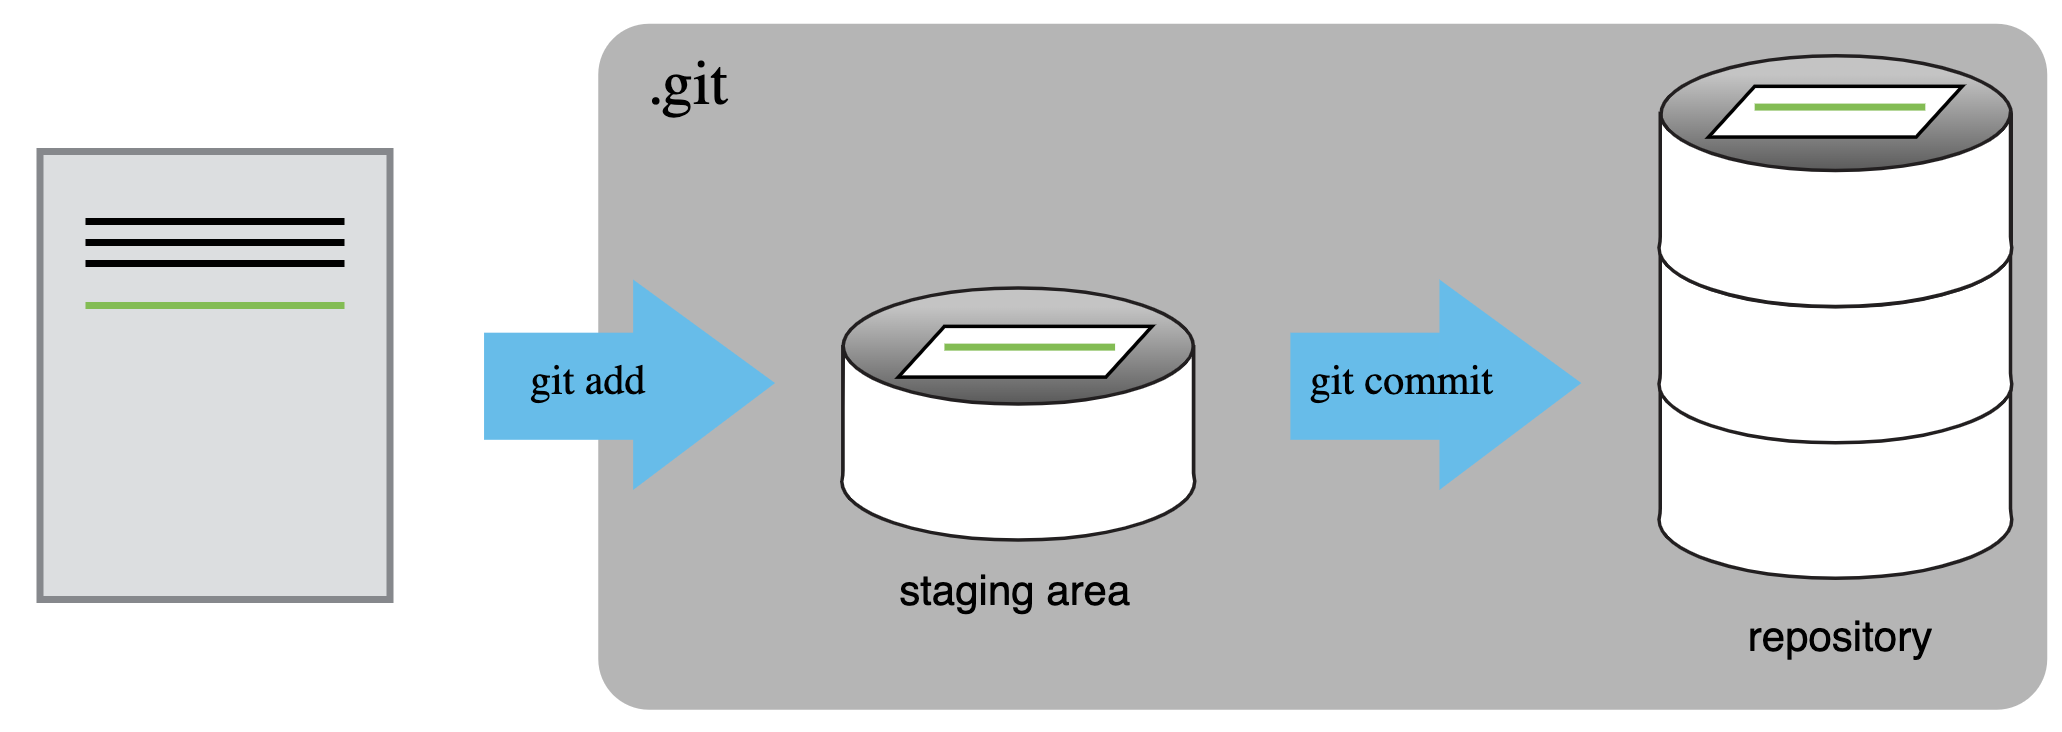
A commit, or “revision”, is an individual change to a file or set of
files. It’s like when you save a file, except with git,
every time you save it creates a unique ID (a.k.a. the “SHA” or “hash”)
that allows you to keep record of what changes were made when and by
who. Each commit contains several key pieces of information that
uniquely define its state:
Commit message: A description provided by the user explaining the purpose or details of the commit.
Committer: The person who added the commit to the repository.
Commit date: The date and time when the commit was added to the repository.
Author: The original creator of the changes in the commit, which may differ from the committer.
Authoring date: The date and time when the changes were originally made by the author.
Parent commit(s): Reference to the previous commit(s), which allows Git to trace the history and create a chain of commits.
Working directory hash: A unique hash representing the state of all tracked files in the working directory at the time of the commit.
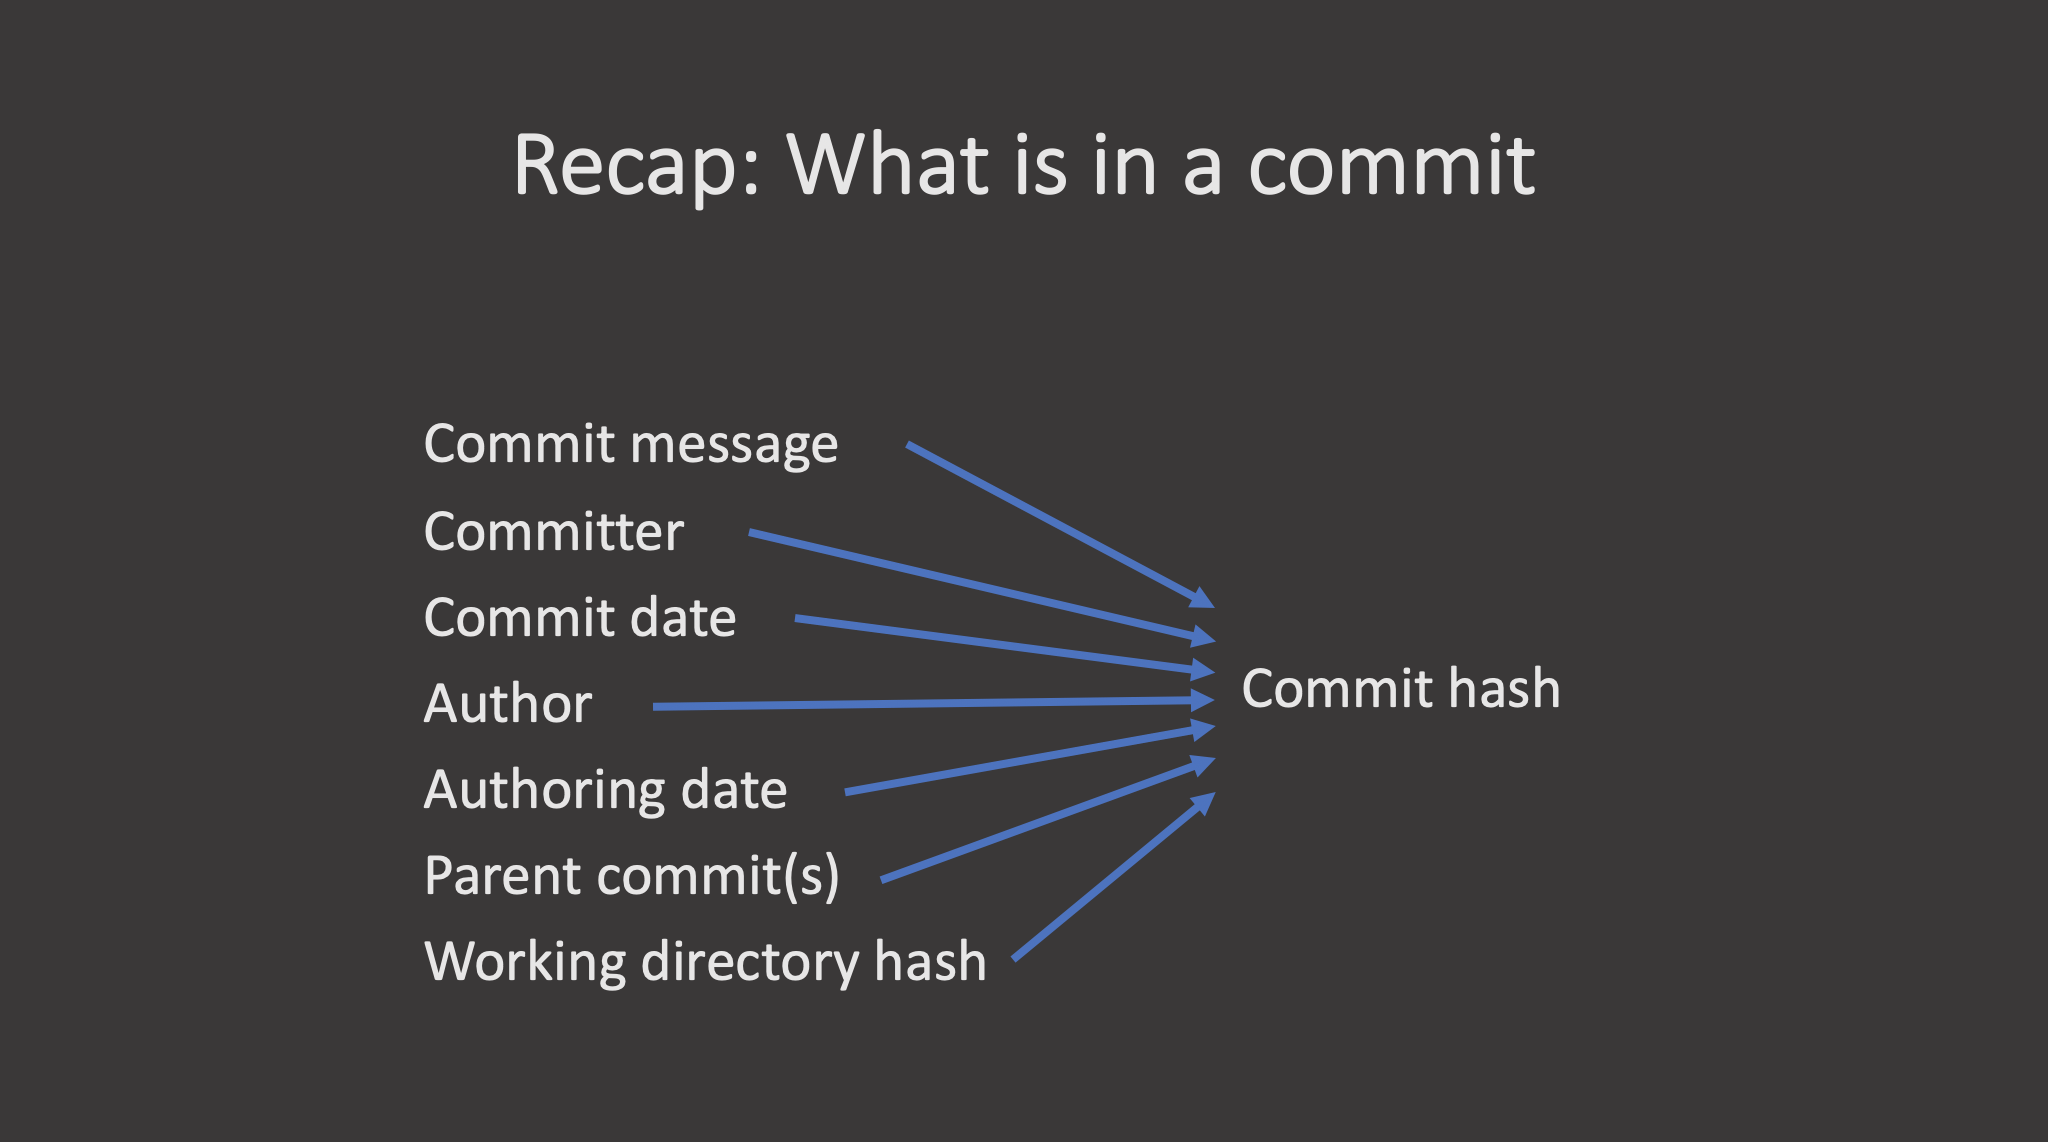
All these elements together generate a unique commit hash, which identifies the commit across the Git repository.
git checkout returns the files not yet committed within
the local repository to a previous state, whereas
git revert reverses changes committed to the local and
project repositories.
Finally, the git fetch command downloads commits, files,
and refs from a remote repository into your local repository. When
downloading content from a remote repository, git pull and
git fetch commands are available to accomplish the task.
You can consider git fetch the ‘safe’ version of the two commands. It
will download the remote content but not update your local repository’s
working state, leaving your current work intact. git pull
is the more aggressive alternative; it will download the remote content
for the active local branch and immediately execute
git merge to create a merge commit for the new remote
content. If you have pending changes in progress this will cause
conflicts and kick-off the merge conflict resolution flow. The following
command will bring down all the changes from the
remote:
It is sometimes useful to only pull the changes from a certain
branch, e.g., main. For a repository that has a lot of
contributors and branches, all the changes may be unnecessary and
overwhelming:
https://www.atlassian.com/git/tutorials/syncing/git-fetch
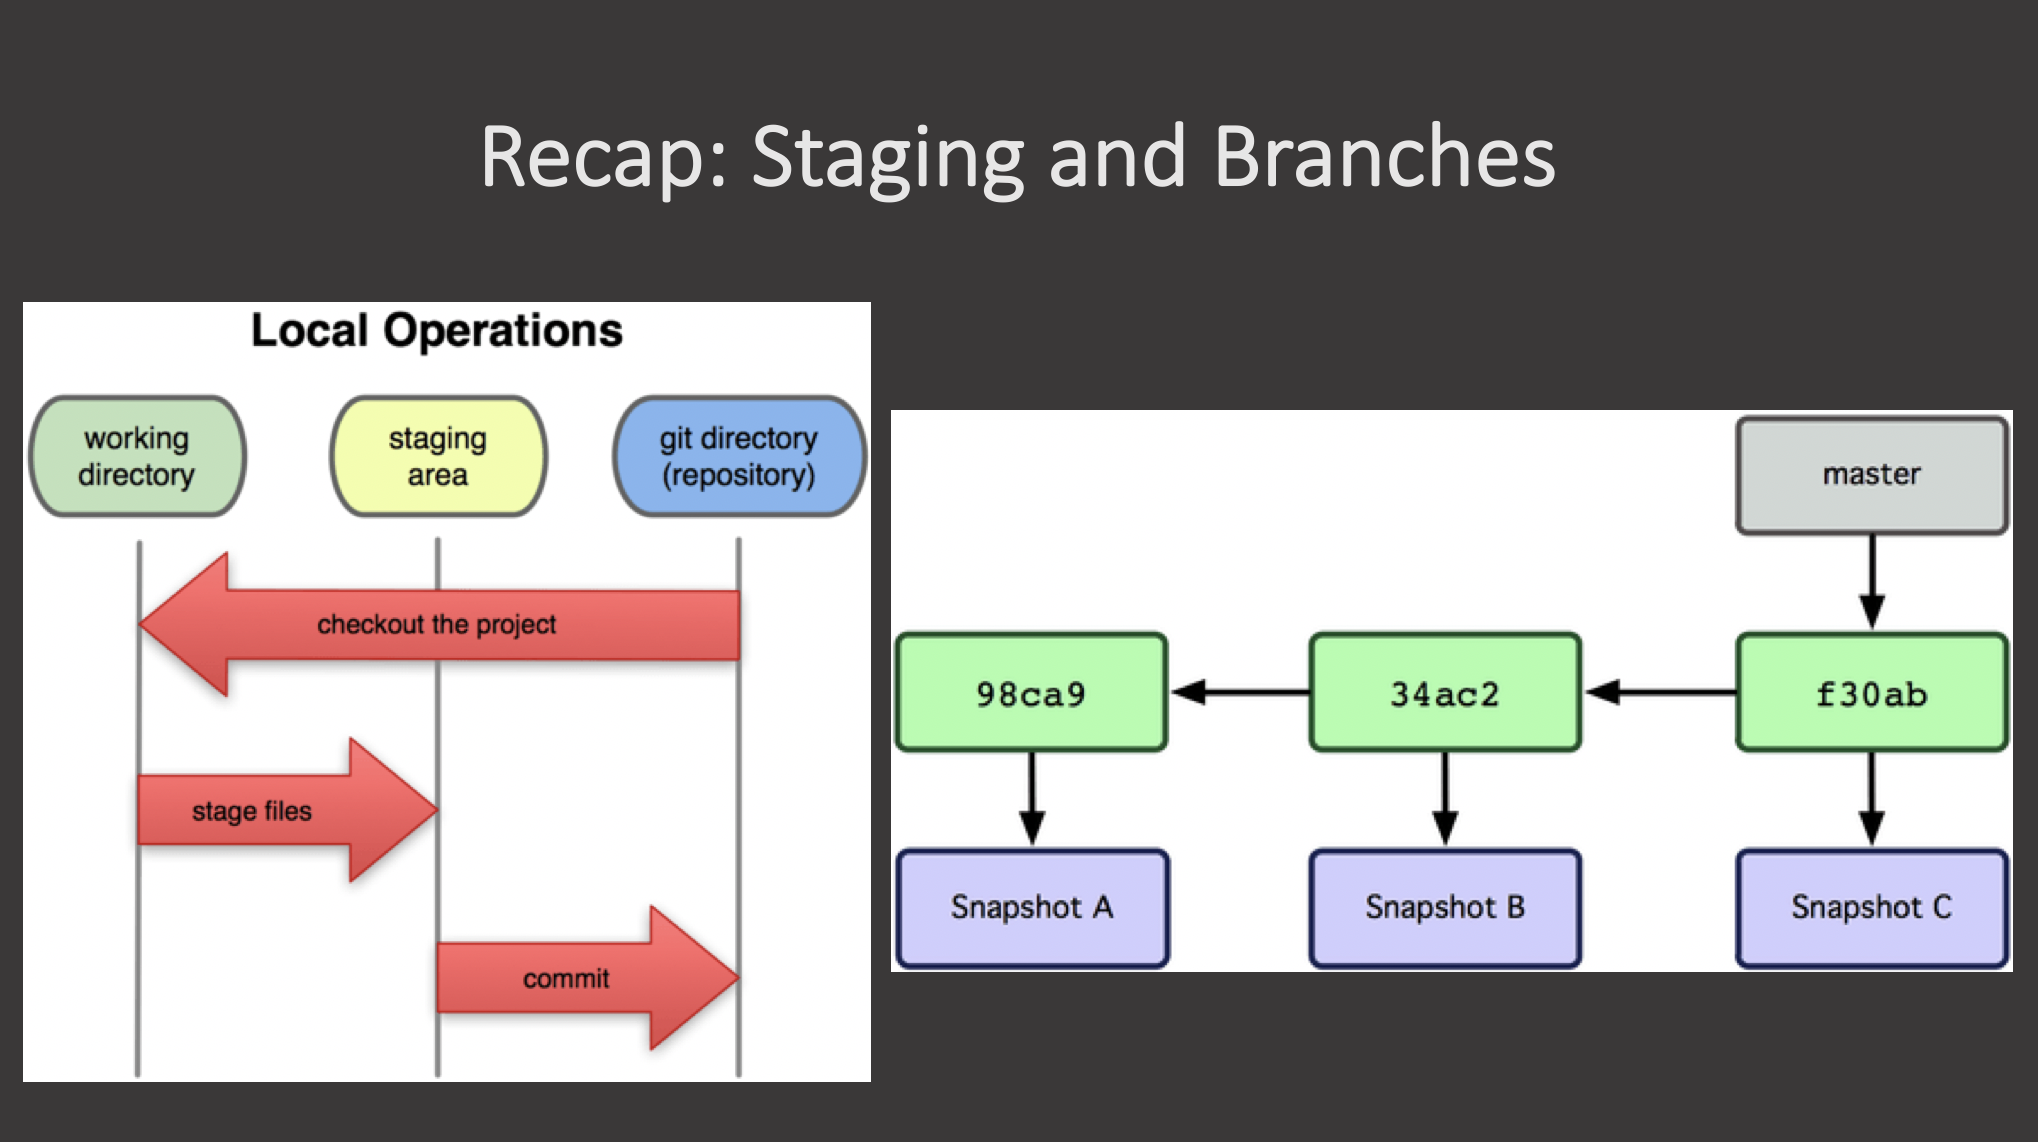 {alt =“A diagram showing
alternate diagrams for understanding the working directory, staging
area, and repository in git, as well as commits on a branch.”}
{alt =“A diagram showing
alternate diagrams for understanding the working directory, staging
area, and repository in git, as well as commits on a branch.”}
- Git version control records text-based differences between files.
- Each git commit records a change relative to the previous state of the documents.
- Git has a range of functionality that allows users to manage the changes they make.
- This complex functionality is especially useful when collaborating on projects with others
Content from Branches
Last updated on 2026-07-15 | Edit this page
Estimated time: 0 minutes
Overview
Questions
- What are branches?
- How do I view the current branches?
- How do I manipulate branches?
Objectives
- Understand how branches are created.
- Learn the key commands to view and manipulate branches.
Branching is a feature available in most modern version control
systems. Branching in other version control systems can be an expensive
operation in both time and disk space. In git, branches are
a part of your everyday development process. When you want to add a new
feature or fix a bug—no matter how big or how small—you spawn a new
branch to encapsulate your changes. This makes it harder for unstable
code to get merged into the main code base, and it gives you the chance
to clean up your future’s history before merging it into the main
branch.
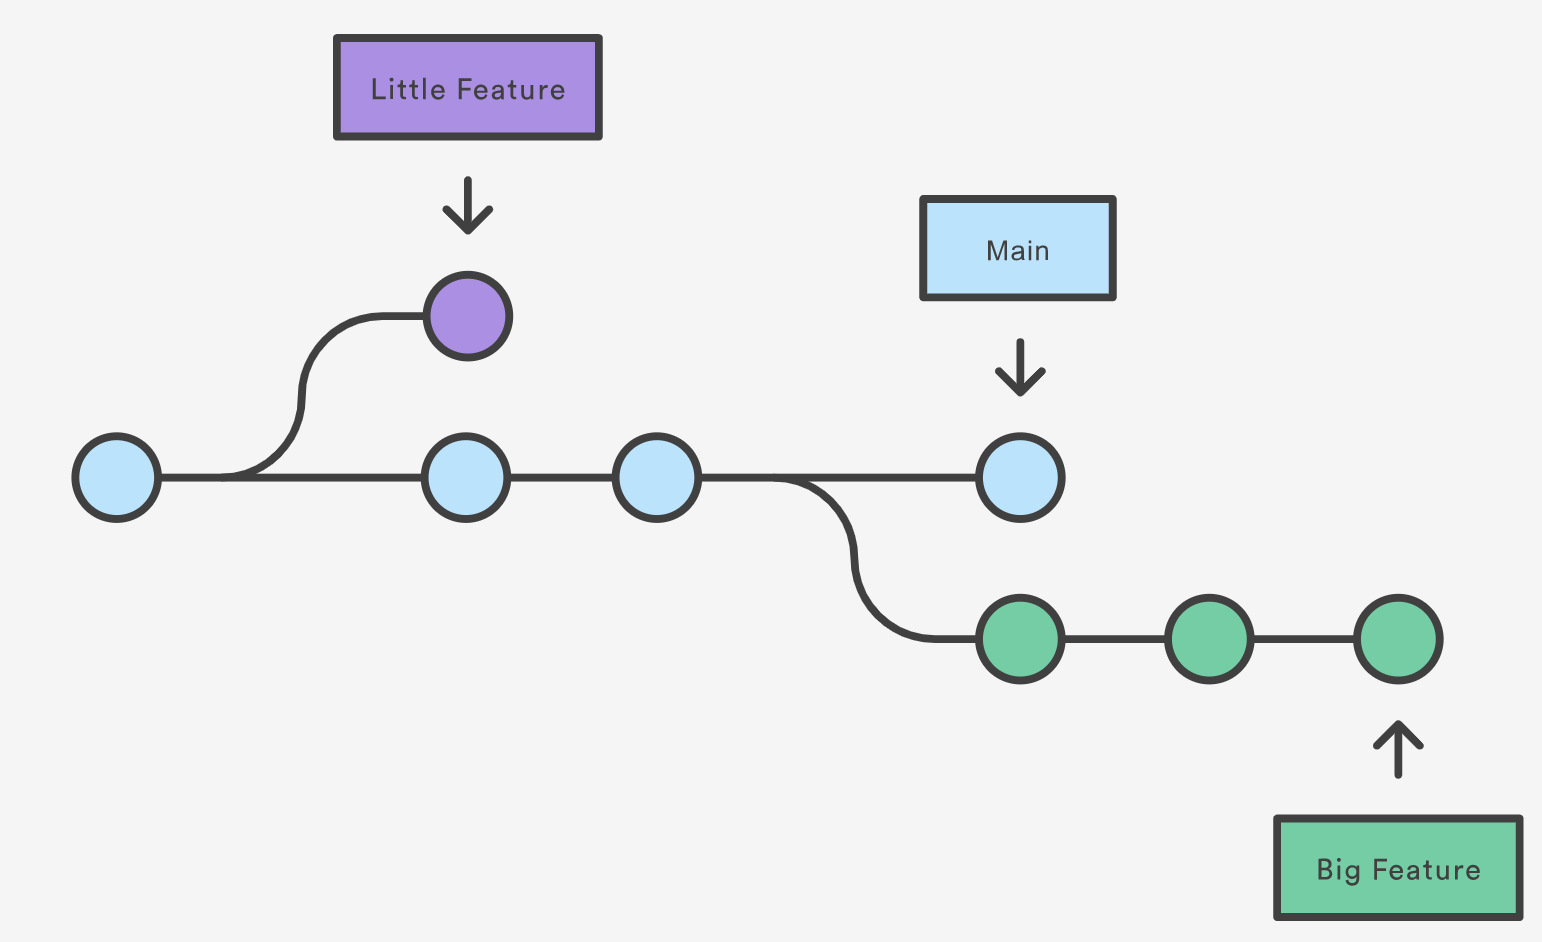
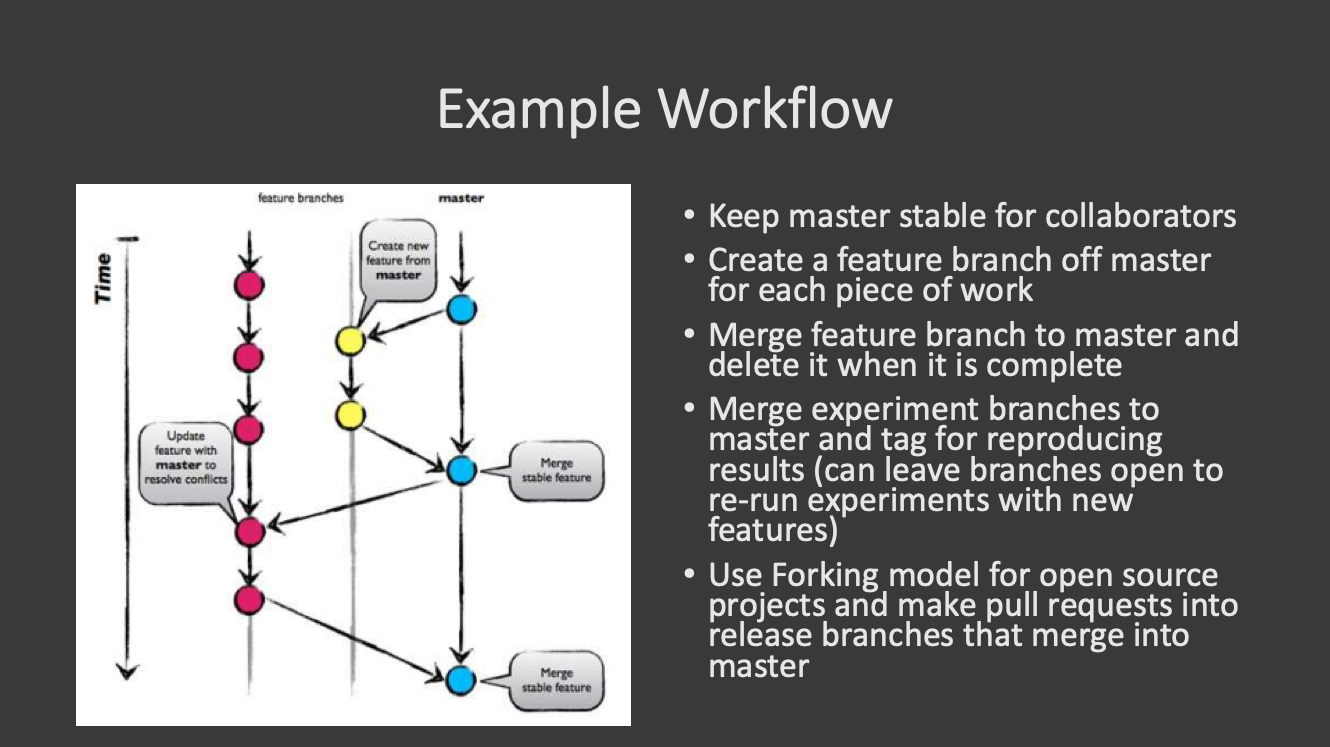
The diagram above visualizes a repository with two isolated lines of development, one for a little feature, and one for a longer-running feature. By developing them in branches, it’s not only possible to work on both of them in parallel, but it also keeps the main branch free from questionable code.
The implementation behind Git branches is much more lightweight than other version control system models. Instead of copying files from directory to directory, Git stores a branch as a reference to a commit. In this sense, a branch represents the tip of a series of commits—it’s not a container for commits. The history for a branch is extrapolated through the commit relationships.
What is a branch?
In git a branch is effectively a pointer to a snapshot
of your changes. It’s important to understand that branches are just
pointers to commits. When you create a branch, all Git needs to do is
create a new pointer, it doesn’t change the repository in any other way.
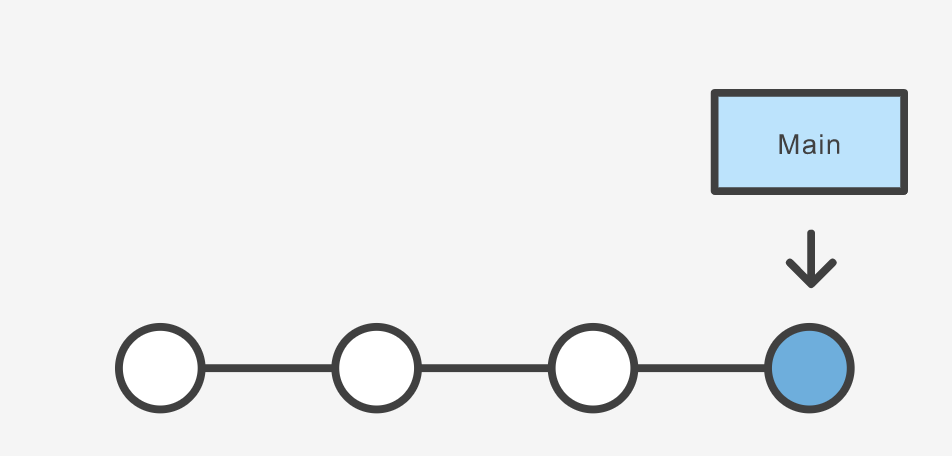
If you start with a repository that looks like this:
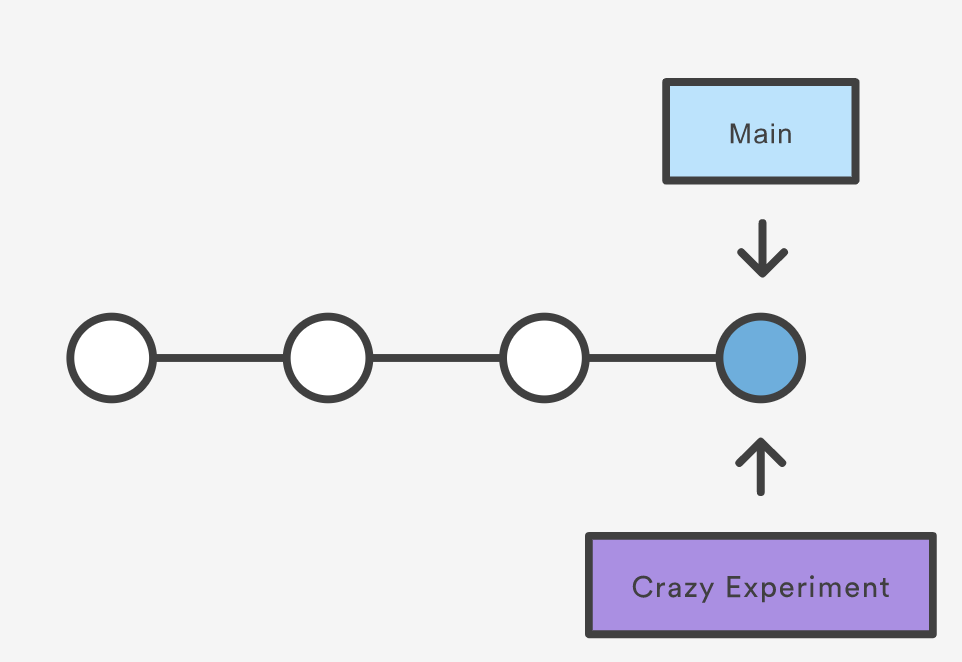
Let’s say we wanted to reworking our recipes to use a different format. We could continue on our existing branch, but we’re not so sure about this change, so instead we create a new branch to experiment with:
The repository history remains unchanged. All you get is a new pointer to the current commit:
Note that this only creates the new branch. To start adding commits
to it, you need to move to it with git checkout, and then
use the standard git add and git commit
commands.
A branch also means an independent line of development. Branches serve as an abstraction for the edit/stage/commit process. New commits are recorded in the history for the current branch, which results in a fork in the history of the project. However, it is really important to remember that each commit only records the incremental change in the document and NOT the full history of changes. Therefore, while we think of a branch as a sequence of commits, each commit is independent unit of change.
Branching Commands
Creating, deleting, and modifying branches is quick and easy; here’s a summary of the commands:
To list all branches:
OUTPUT
$ git branch
* main
  yaml-format
The asterisk (*) indicates the current branch. To see
more information about each branch, including the latest commit on each
branch, use the -avv flags:
OUTPUT
$ git branch -avv
* main        ec240ab Ignore png files and the pictures folder.
  yaml-format ec240ab Ignore png files and the pictures folder.
We can see that, as we have not added any new commits to the
yaml-format branch, both branches point to the same commit
(ec240ab).
To create a new branch named <branch>, which
references the same point in history as the current branch.
To create a new branch named <branch>, referencing
<start-point>, which may be specified any way you
like, including using a branch name or a tag name:
To delete the branch <branch>; if the branch is
not fully merged in its upstream branch or contained in the current
branch, this command will fail with a warning:
To delete the branch <branch> irrespective of its
merged status:
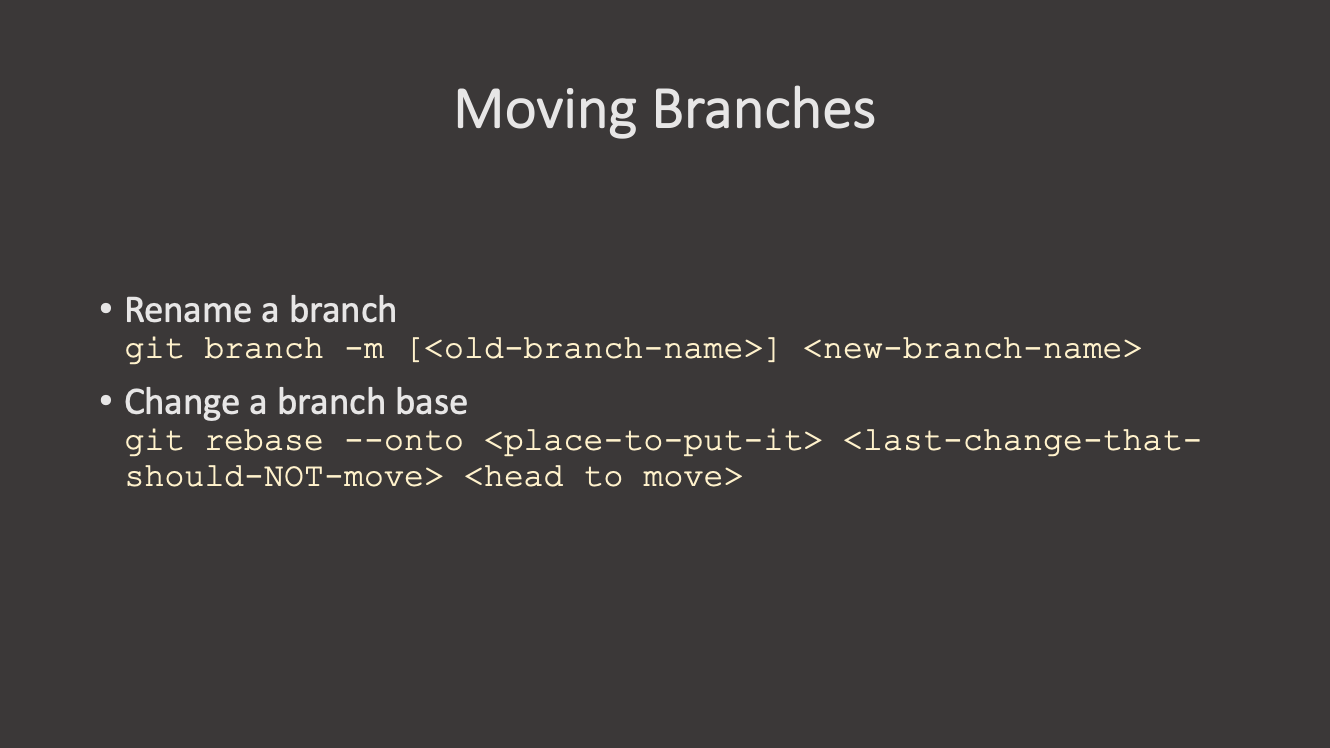
Renaming a branch can be done with the -m tag:
Let’s switch over to our new branch so we can start making changes:
OUTPUT
$ git switch yaml-format
Switched to branch 'yaml-format'git switch was introduced in Git 2.23 as a more purpose
specific command for switching branches. It is functionally similar to
git checkout, which is still used widely, but is a more
general command with multiple purposes (switching branches, restoring
files, etc).
To create a new branch <new> referencing
<start-point>, and check it out.
The special symbol "HEAD" can always be used to refer to
the current branch. In fact, Git uses a file named HEAD in
the .git directory to remember which branch is current:
Let’s reformat our recipe to use YAML and commit the changes:
name: Guacamole
ingredients:
  avocado: 1.35
  lime: 0.64
  salt: 2
instructions: ""Now let’s check our branches again:
OUTPUT
$ git branch -avv
  main        ec240ab Ignore png files and the pictures folder.
* yaml-format a2b55be Reformat recipe to use YAML.
Challenge
Challenge 1: Renaming a file in a branch
We updated our guacamole recipe in the yaml-format
branch to use a different format. But now the file extension
.md doesn’t make sense anymore. Rename the file to
guacamole.yaml and commit the change to the
yaml-format branch. Run git status before you
commit your changes. Is there anything different about the way this
commit looks than in our earlier exercises?
OUTPUT
$ git status
On branch yaml-format
Changes to be committed:
  (use "git restore --staged <file>..." to unstage)
        renamed:    guacamole.md -> guacamole.yaml
Git is not very clever about most things, but as long as the contents of the file are identical, it can at least figure out that we just renamed the file, rather than deleting one and adding another.
Challenge
Challenge 2: Renaming a branch You realize the branch name
yaml-format is not descriptive enough. Rename it to
feature/yaml-format without losing any of your work.
You can check the documentation of git branch with
git branch --help
Challenge
Challenge 3: Deleting an Unmerged Branch
We think about adding new dessert recipes to our recipe collection. To avoid affecting the main branch we need to create a new branch named dessert-recipes and switch to this branch.
After that, we create a simple cookie recipe with the name cookies.md and commit it.
Later we decide that it’s not the right time to start with the dessert recipes and cookies and we don’t want the cookie recipe to remain in our repository.
What happens when we use git branch -d? Why does git react this way and how can we force the deletion?
Think about how you checked the documentation in the previous challenge.
BASH
git switch -c dessert-recipes
nano cookies.md

(add recipe content)

git add cookies.md
git commit -m "Add chocolate chip cookies recipe."
git switch main

git branch -d dessert-recipes
OUTPUT
$ git branch -d dessert-recipes
error: the branch 'dessert-recipes' is not fully merged
hint: If you are sure you want to delete it, run 'git branch -D dessert-recipes'
Git uses -d as a safety net - it will not delete a
branch that has not been merged into the current branch, as that would
mean losing commits that exist nowhere else. -D bypasses
this check and deletes the branch even if it is not merged.
OUTPUT
Deleted branch dessert-recipes (was <commit-hash>).- A branch represents an independent line of development.
-
git branchcreates a new pointer to the current state of the repository and allows you to make subsequent changes from that state. - Subsequent changes are considered to belong to that branch.
- The final commit on a given branch is its HEAD.
Content from Remote Repositories
Last updated on 2026-07-15 | Edit this page
Estimated time: 0 minutes
Overview
Questions
- How do I connect my code to other versions of the it?
Objectives
- Learn about remote repositories.
https://www.atlassian.com/git/tutorials/syncing
Git’s distributed collaboration model, which gives every developer their own copy of the repository, complete with its own local history and branch structure. Users typically need to share a series of commits rather than a single “changeset”. Instead of committing a “changeset” from a working copy to the central repository, Git lets you share entire branches between repositories.
Git remote
The git remote command lets you create, view, and delete connections to other repositories. Remote connections are more like bookmarks rather than direct links into other repositories. Instead of providing real-time access to another repository, they serve as convenient names that can be used to reference a not-so-convenient URL.
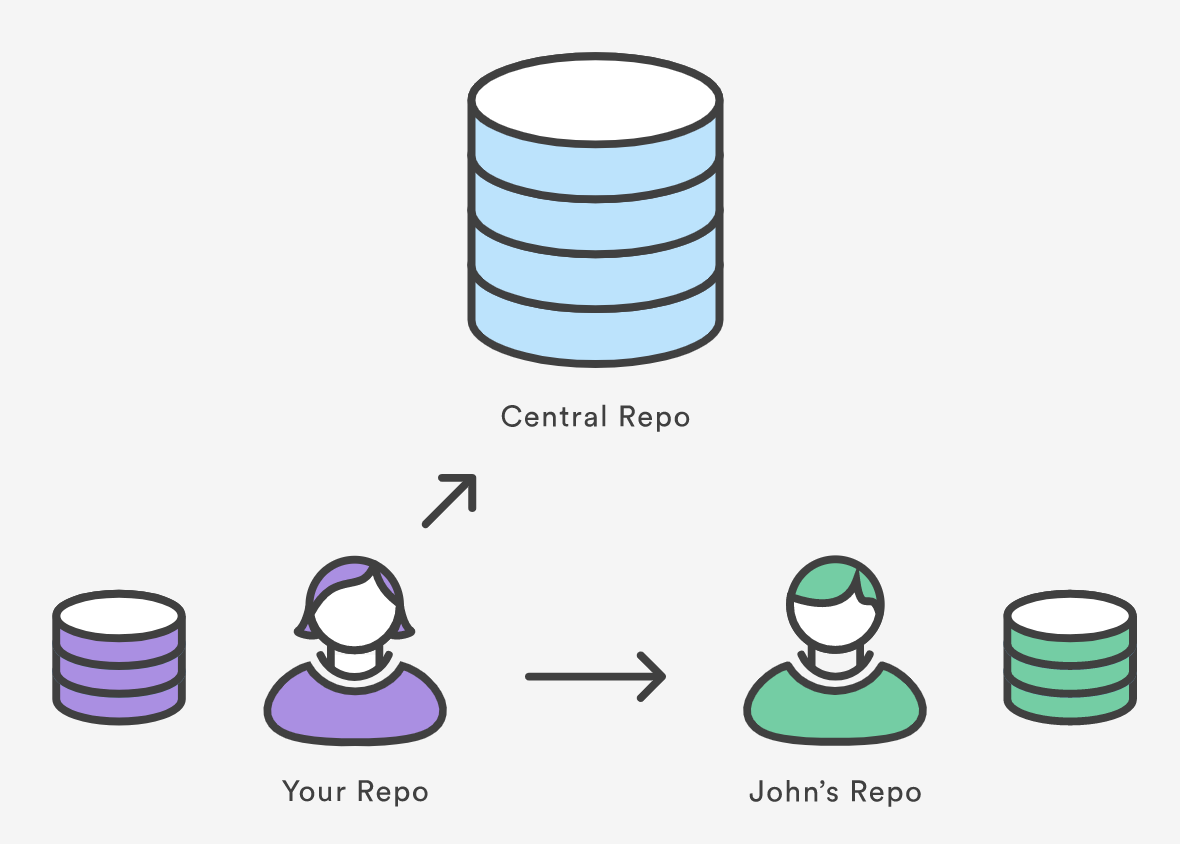
For example, the diagram above shows two remote connections from your repo into the central repo and another developer’s repo. Instead of referencing them by their full URLs, you can pass the origin and john shortcuts to other Git commands.
The git remote command is essentially an interface for
managing a list of remote entries that are stored in the repository’s
./.git/config file. The following commands are used to view
the current state of the remote list.
Git is designed to give each developer an entirely isolated
development environment. This means that information is not
automatically passed back and forth between repositories. Instead,
developers need to manually pull upstream commits into their local
repository or manually push their local commits back up to the central
repository. The git remote command is really just an easier
way to pass URLs to these “sharing” commands.
Adding a Remote Repository
Earlier, we created a repository on GitLab. Now, we need to connect
our local repository to that remote repository. The command for this is
git remote add:
You can find the repository URL on the main page of your remote
repository. It should look something like
https://gitlab.com/username/repository-name.git. The
location of this URL will depend on the hosting service you are using
(GitLab, GitHub, Bitbucket, etc.).
Most hosting services will provide the URL in two forms: HTTPS and SSH. If you are unsure which one to use, choose HTTPS. SSH requires additional setup which we do not cover in this training.
View Remote Configuration
To list the remote connections of your repository to other
repositories you can use the git remote command:
If you test this in our training repository, you should get only one
connection, origin:
When you clone a repository with git clone,
git automatically creates a remote connection called
origin pointing back to the cloned repository. This is
useful for developers creating a local copy of a central repository,
since it provides an easy way to pull upstream changes or publish local
commits. This behaviour is also why most Git-based projects call their
central repository origin.
We can ask git for a more verbose (-v)
answer which gives us the URLs for the connections:
Syncing with Remote Repositories
So we have a remote connection, but how do we make the code in our
local repository match the code in the remote repository? There are
three commands that we use to sync code between repositories:
git fetch, git pull, and
git push.
-
fetch- Downloads commits, files, and refs, but does not modify your working directory. This gives you a chance to review changes before integrating them into your local repository. -
pull- Downloads commits, files, and refs, and immediately merges them into your local branch. This is a convenient way to integrate changes from a remote repository into your local repository in one step. -
push- Uploads your local commits to a remote repository. This is how you share your changes with other developers.
Let’s use git pull to retrieve the latest changes from
the remote repository:
OUTPUT
$ git pull
remote: Enumerating objects: 3, done.
remote: Counting objects: 100% (3/3), done.
remote: Compressing objects: 100% (2/2), done.
remote: Total 3 (delta 0), reused 0 (delta 0), pack-reused 0 (from 0)
Unpacking objects: 100% (3/3), 2.74 KiB | 701.00 KiB/s, done.
From <REPOSITORY-URL>
 * [new branch]      main       -> origin/main
There is no tracking information for the current branch.
Please specify which branch you want to merge with.
See git-pull(1) for details.

    git pull <remote> <branch>

If you wish to set tracking information for this branch you can do so with:

    git branch --set-upstream-to=origin/<branch> main
So what happened? As we might have seen in previous sections, git
isn’t always clever, or at least it isn’t willing to make assumptions
about what we want to do. In this case, git is saying that it pulled
down changes from the remote repository, but it doesn’t know what to do
with them. This is because our local main branch isn’t set
up to track the main branch on the origin
remote.
We can use the suggested command to set up the tracking information:
This explicitly tells git that the local main branch is
the same as the main branch on the origin
remote. Now, if we run git pull again, git will know what
to do:
Viewing Remote Information
To see more detailed information about a specific remote connection,
you can use the git remote show command followed by the
name of the remote. For example, to see information about the
origin remote, you would run:
OUTPUT
$ git remote show origin
* remote origin
  Fetch URL: <REPOSITORY-URL>
  Push  URL: <REPOSITORY-URL>
  HEAD branch: main
  Remote branch:
    main tracked
  Local branch configured for 'git pull':
    main merges with remote main
  Local ref configured for 'git push':
main pushes to main (fast-forwardable)It’s possible to have more than one remote for a given repository.
You can add additional remotes with
git remote add <name> <url>, and then view them
with git remote -v or
git remote show <name>.
This might be used if, for instance, you have a central repository
that you store your projects in, but also another repository that you
use for backup purposes. You could have remotes called
origin and backup, each pointing to different
URLs.
Pushing to Remote Repositories
We pulled changes from the remote repository, but if we refresh the
page on Gitlab, we won’t see our local commits there. If we run the
git status command we can see that git is aware that our
local branch has some commits that aren’t on the remote branch:
OUTPUT
$ git status
On branch main
Your branch is ahead of 'origin/main' by 9 commits.
  (use "git push" to publish your local commits)

nothing to commit, working tree clean
Let’s use the git push command to upload our local
commits to the remote repository:
OUTPUT
$ git push
Enumerating objects: 28, done.
Counting objects: 100% (28/28), done.
Delta compression using up to 2 threads
Compressing objects: 100% (21/21), done.
Writing objects: 100% (27/27), 2.72 KiB | 696.00 KiB/s, done.
Total 27 (delta 4), reused 0 (delta 0), pack-reused 0
To <REPOSITORY-URL>
   5be9f46..0622c3a  main -> main
If we now refresh the page on Gitlab, we should see our commits there!
The git remote command also lets you manage connections
with other repositories. The following commands will modify the repo’s
./.git/config file. The result of the following commands
can also be achieved by directly editing the ./.git/config
file with a text editor.
Create a new connection to a remote repository. After adding a
remote, you’ll be able to use <name> as a convenient
shortcut for <url> in other Git commands.
Remove the connection:
Rename a connection:
To get high-level information about the remote
<name>:
Exercise: Add a connection to your neighbour’s repository. Having this kind of access to individual developers’ repositories makes it possible to collaborate outside of the central repository. This can be very useful for small teams working on a large project.
Starting a branch from the main repository state:
Remember that when you create a new branch without specifying a starting point, then the starting point will be the current state and branch. In order to avoid confusion, ALWAYS branch from the stable version. Here is how you would branch from your own origin/main branch:
You must fetch first so that you have the most recent state of the repository.
If there is another “true” version/state of the project, then this
connection may be set as upstream (or something else).
Upstream is a common name for the stable repository, then
the sequence will be:
Now we can set the MPIA version of our repository as the upstream for our local copy.
Setting the upstream repository
Set the https://github.com/mpi-astronomy/advanced-git-training as the upstream locally.
Then, examine the state of your repository with
git branch, git remote -v,
git remote show upstream
Creating a branch and pushing it to the remote
Create a new branch in our local repository called
bean-dip and add the following recipe in a file called
bean-dip.md:
# Bean Dip
## Ingredients
- beans
## Instructions
Add and commit the new file, then push the new branch to the remote
repository with git push. What happens? Can you find the
branch on the remote?
BASH
git branch bean-dip
git switch bean-dip
nano bean-dip.md
git add bean-dip.md
git commit -m "Add bean dip recipe."
git push
What happens here can depend on the version of git you are using. In more recent versions, git will automatically create the remote branch when you push a local branch that doesn’t exist on the remote. In older versions, you may need to specify the remote and branch name explicitly:
Fetching Remote Changes
We need to visit GitHub to make our edits directly on the
README.md file using the web UI and commit the change.
Now back in our local git repo, we will first fetch the changes but not merge them yet, see what was fetched, compare both local and remote statuses, then finally pull the changes.
How does git fetch differ from git pull
based on what you observed?
You can use git log --oneline --all to see commits
across all branches, including remote-tracking branches like
origin/main.
OUTPUT
On branch main
Your branch is behind 'origin/main' by 1 commit, and can be fast-forwarded.
  (use "git pull" to update your local branch)
nothing to commit, working tree cleanOUTPUT
a4275da (origin/main, origin/HEAD) Change title in README.md
4eef8f7 (HEAD -> main) Init commit
b02715d Initial commitOUTPUT
Updating 4eef8f7..a4275da
Fast-forward
 README.md | 2 +-
 1 file changed, 1 insertion(+), 1 deletion(-)
git fetch pulls the updates from the remote, it does not
move the local branches and leaves the remote branch updated
(origin/main), while the local is not touched
(HEAD -> main), as shown by the log. The
git pull command executes fetch and merge at once.
- The
git remotecommand allows us to create, view and delete connections to other repositories. - Remote connections are like bookmarks to other repositories.
- Other git commands (
git fetch,git push,git pull) use these bookmarks to carry out their syncing responsibilities.
Content from Undoing Changes
Last updated on 2026-06-16 | Edit this page
Estimated time: 0 minutes
Overview
Questions
- How do I undo changes?
Objectives
- How do I roll back a single change?
- How do I get back to a specific state?
Git Revert
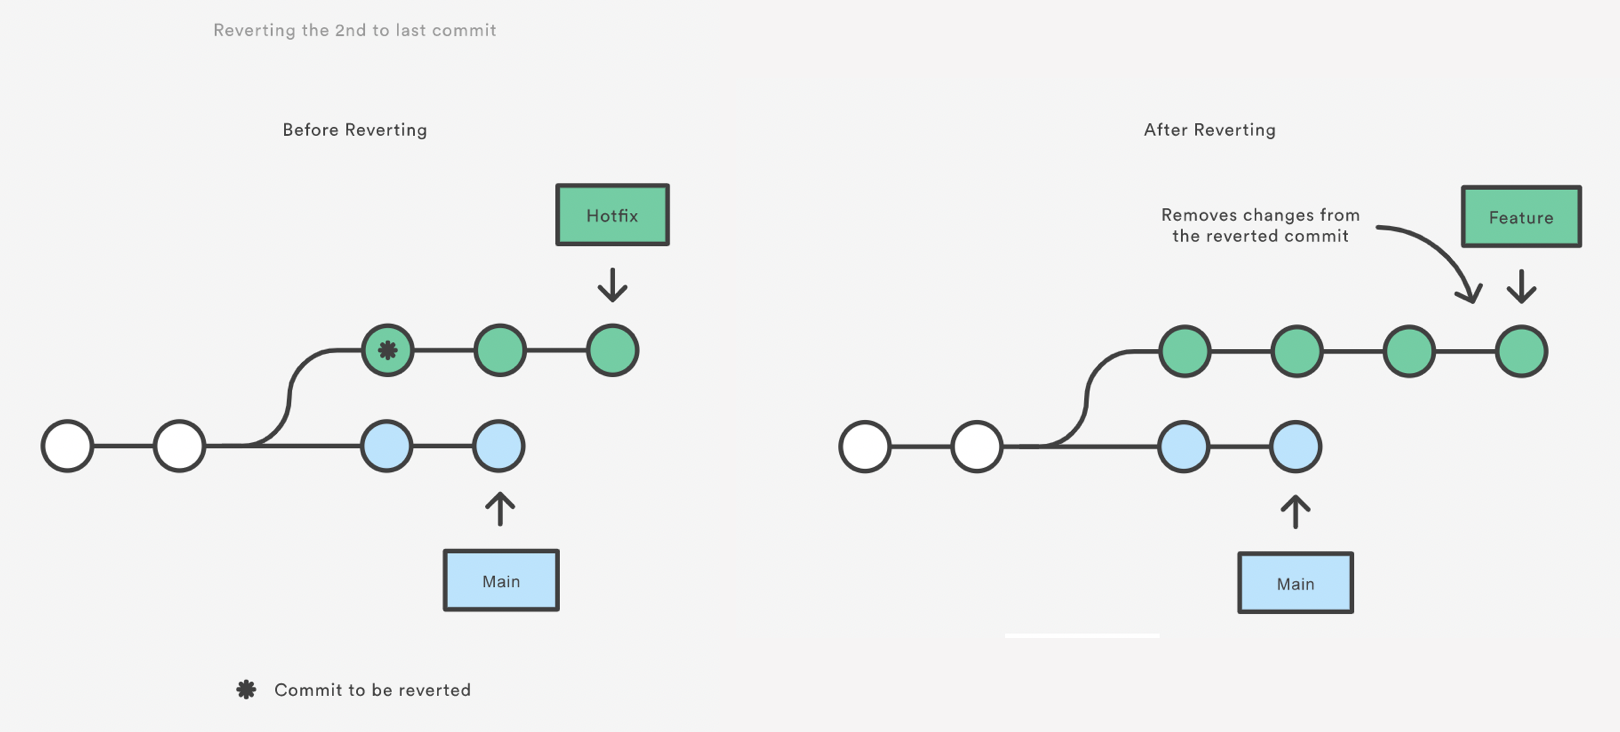
Reverting undoes a commit by creating a new commit. This is a safe way to undo changes, as it has no chance of re-writing the commit history. For example, the following command will figure out the changes contained in the 2nd to last commit, create a new commit undoing those changes, and tack the new commit onto the existing project.
Let’s make a commit to revert first. On our bean-dip
branch, let’s add a line to our bean-dip.md file and commit
it.
After making that commit, maybe we second guess and decide we don’t
want that change after all. We can use git revert to back
out that last commit.
We get a text editor window asking us for a commit message for the revert commit. Save and close the editor to complete the revert.
Let’s run git log --oneline to see what happened.
OUTPUT
$ git log --oneline
96f26c7 (HEAD -> bean-dip) Revert "Add bean dip recipe"
b8732e4 Add bean dip recipe
79cb366 (origin/bean-dip) Add bean dip recipe.
Reverting doesn’t actually delete the previous commit - it just creates a new commit that undoes exactly the changes made in that commit.
We can also revert to specific commits by providing the commit SHA
instead of HEAD, or undo several commits by using
HEAD~n where n is the number of commits to go
back.
Note that revert only backs out the atomic changes of the ONE specific commit (by default, you can also give it a range of commits but we are not going to do that here, see the help).
git revert does not rewrite history which is why it is
the preferred way of dealing with issues when the changes have already
been pushed to a remote repository.
Git Reset
Resetting is a way to move the tip of a branch to a different commit. This can be used to remove commits from the current branch. For example, the following command moves the branch backwards by two commits.
OUTPUT
$ git reset HEAD~1
Unstaged changes after reset:
D       bean-dip.md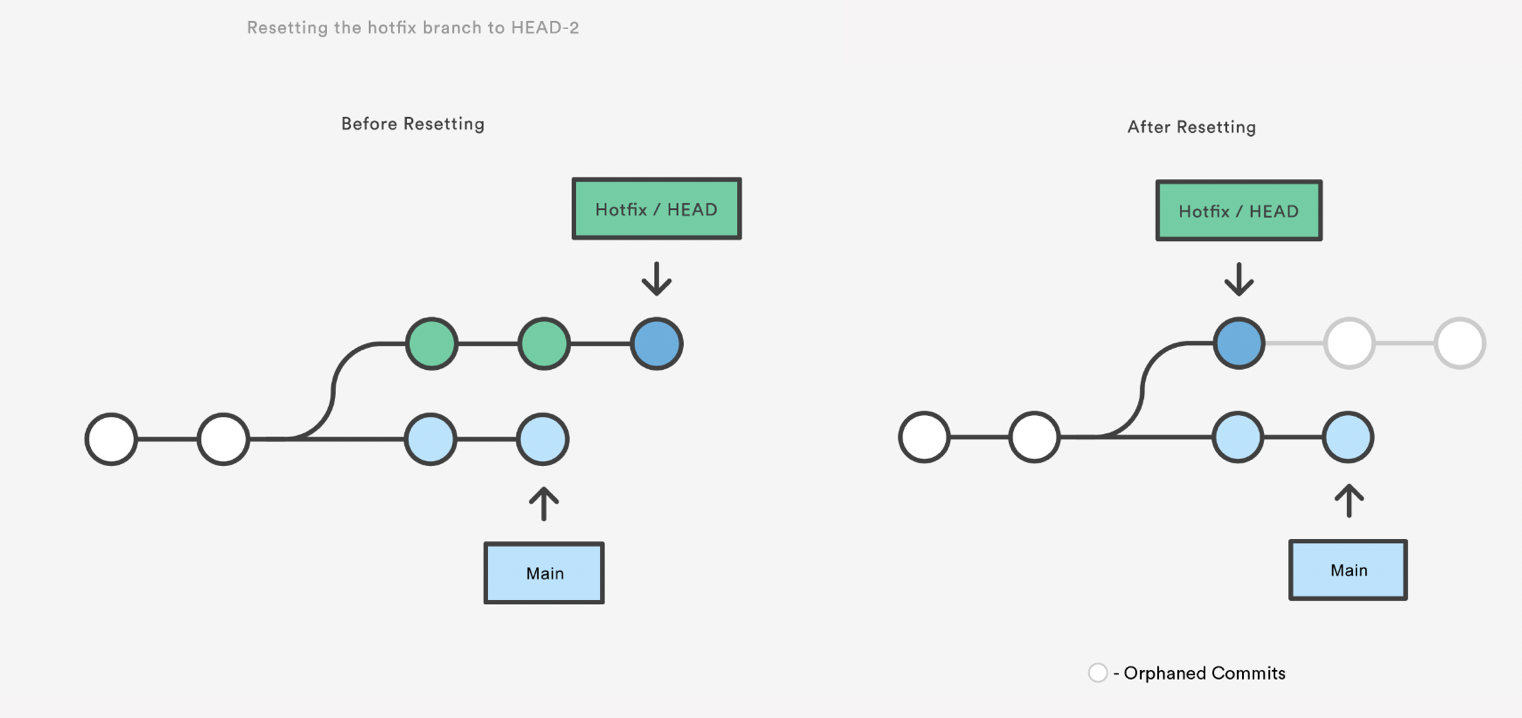
The two commits that were on the end of hotfix are now
dangling, or orphaned commits. This means they will be deleted the next
time git performs a garbage collection. In other words,
you’re saying that you want to throw away these commits.
git reset is a simple way to undo changes that haven’t
been shared with anyone else. It’s your go-to command when you’ve
started working on a feature and find yourself thinking, “Oh crap, what
am I doing? I should just start over.”
In addition to moving the current branch, you can also get
git reset to alter the staged snapshot and/or the working
directory by passing it one of the following flags:
–soft – The staged snapshot and working directory are not altered in any way.
–mixed – The staged snapshot is updated to match the specified commit, but the working directory is not affected. This is the default option.
–hard – The staged snapshot and the working directory are both updated to match the specified commit.
It’s easier to think of these modes as defining the scope of a git reset operation.
Let’s discard our changes completely using --hard:
OUTPUT
$ git reset HEAD --hard
HEAD is now at bb3edf6 Add bean dip recipeGit Checkout: A Gentle Way
We already saw that git checkout is used to move to a
different branch but can also be used to update the state of the
repository to a specific point in the projects history.
OUTPUT
$ git checkout HEAD~2
Note: switching to 'HEAD~2'.

You are in 'detached HEAD' state. You can look around, make experimental
changes and commit them, and you can discard any commits you make in this
state without impacting any branches by switching back to a branch.

If you want to create a new branch to retain commits you create, you may
do so (now or later) by using -c with the switch command. Example:

  git switch -c <new-branch-name>

Or undo this operation with:

  git switch -

Turn off this advice by setting config variable advice.detachedHead to false

HEAD is now at c6ae196 Modify guacamole instructions to include food processor.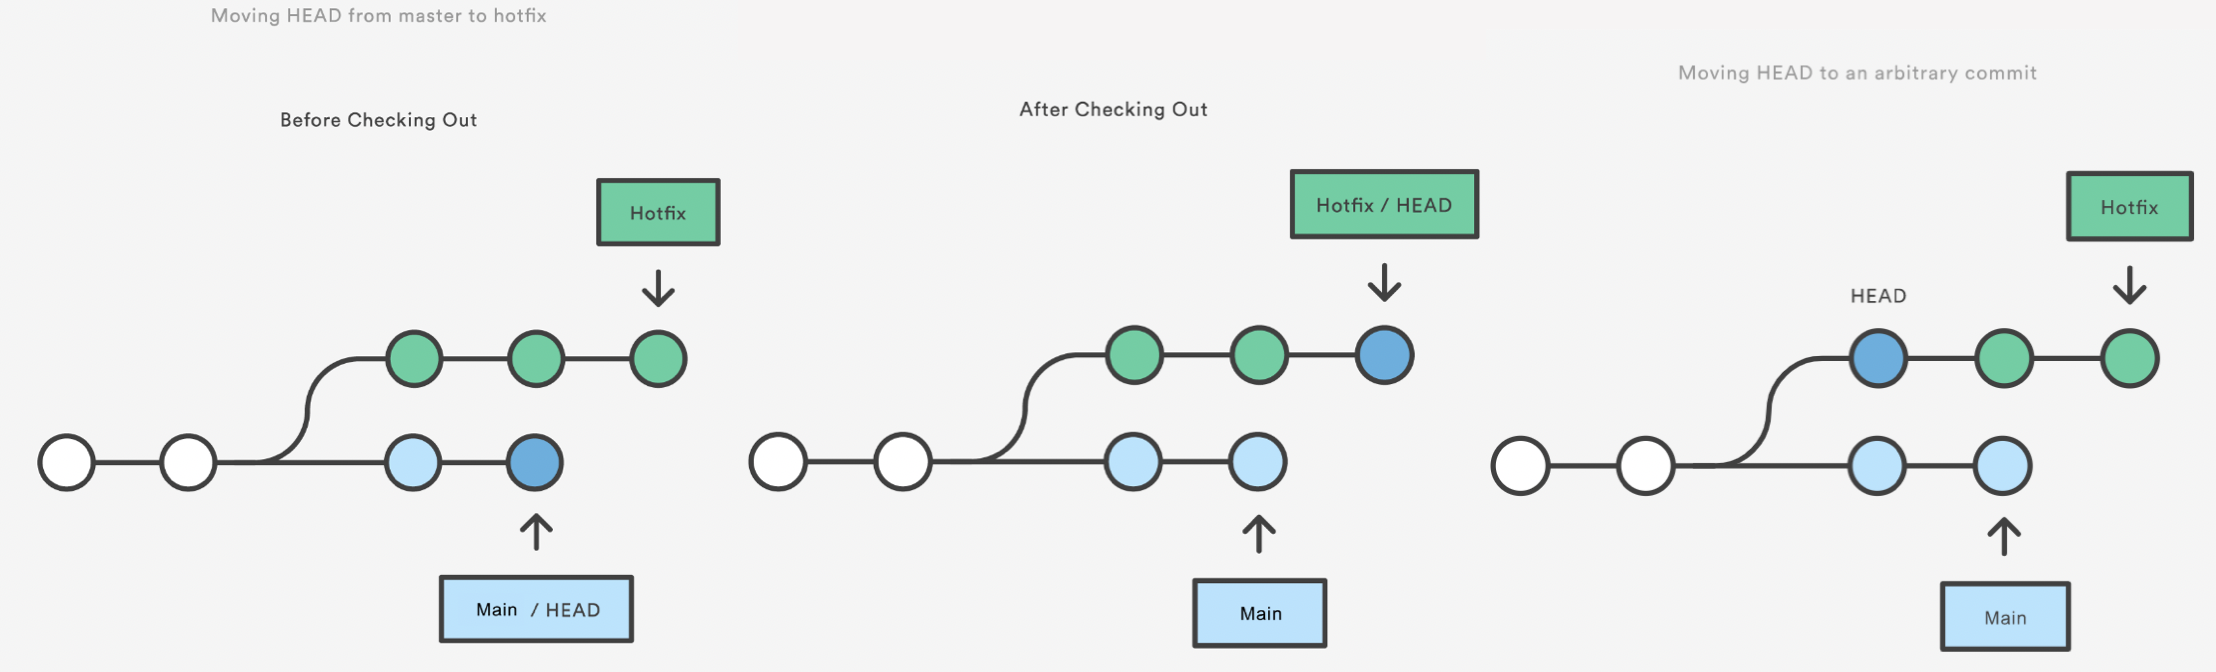
This puts you in a detached HEAD state. AGHRRR!
Most of the time, HEAD points to a branch name. When you add a new commit, your branch reference is updated to point to it, but HEAD remains the same. When you change branches, HEAD is updated to point to the branch you’ve switched to. All of that means that, in these scenarios, HEAD is synonymous with “the last commit in the current branch.” This is the normal state, in which HEAD is attached to a branch.
The detached HEAD state is when HEAD is pointing directly to a commit instead of a branch. This is really useful because it allows you to go to a previous point in the project’s history. You can also make changes here and see how they affect the project.
BASH
echo "Welcome to the alternate timeline, Marty!" > new-file.txt
git add .
git commit -m "Create new file"
echo "Another line" >> new-file.txt
git commit -a -m "Add a new line to the file"
git log --oneline
OUTPUT
$ git log --oneline
81c079c (HEAD) Add a new line to the file
1881c24 Create new file
c6ae196 Modify guacamole instructions to include food processor.
...
To save this alternate history, create a new branch:
If you haven’t made any changes or you have made changes but you want to discard them you can recover by switching back to your branch:
https://www.atlassian.com/git/tutorials/resetting-checking-out-and-reverting Also OMG: http://blog.kfish.org/2010/04/git-lola.html
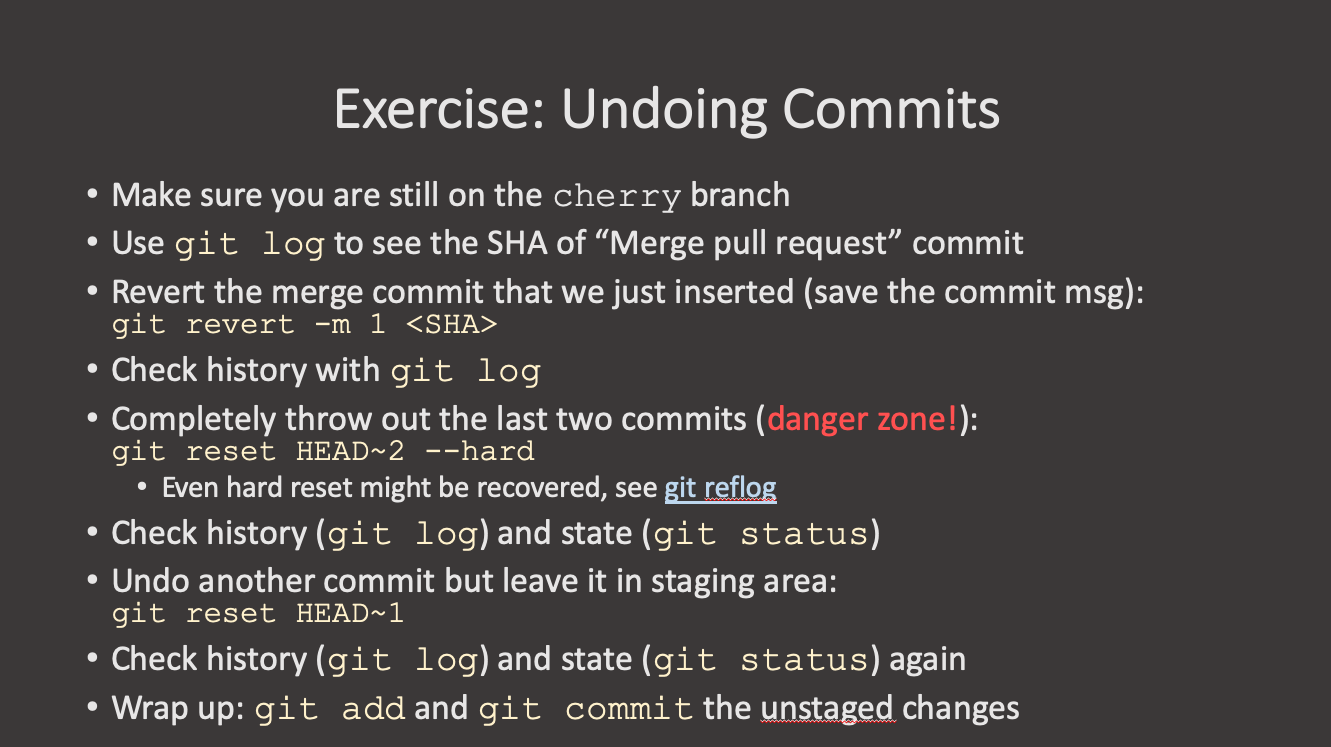
Exercise: Undoing Changes
Exercise: Undoing Changes
- Create a new branch called
soup-recipes. Create a new filesoups/tomato-soup.mdand make 3-4 commits adding ingredients and instructions. Check the log to see the SHA of the last commit. - You realize the last instruction was wrong. Revert the last commit. Check the history.
- The recipe isn’t working out. Completely throw away the last two commits [DANGER ZONE!!!]. Check the status and the log.
- Undo another commit but leave the changes in the staging area so you can review them. Check the status and log.
- After reviewing, you decide to keep the changes. Add and commit them with a better commit message.
-
git resetrolls back the commits and leaves the changes in the files -
git reset --hardroll back and delete all changes -
git resetdoes alter the history of the project. - You should use
git resetto undo local changes that have not been pushed to a remote repository. -
git revertundoes a commit by creating a new commit. -
git revertshould be used to undo changes on a public branch or changes that have already been pushed remotely. -
git revertonly backs out a single commit or a range of commits.
Content from Merging
Last updated on 2026-06-16 | Edit this page
Estimated time: 0 minutes
Overview
Questions
- How do I merge a branch changes?
Objectives
- Learn about
git merge.
When you are collaborating, you will have to merge a branch
independent if your branch may or may not have diverged from the main
branch. Most of the Git hosting platform like GiHub or Gitlab allows you
to merge a branch from their web interface but you can also merge the
branches from your machine using git merge.
There are 2 ways to merge:
non-fast-forward merged (recommended)
fast forward merged

Fast-forward Merge
If there are no conflicts with the main branch, we can perform a
“fast-forward” merge. This works by moving the branch pointer to the
latest commit in the target branch. This is the default behaviour of
git merge (when possible).
Let’s merge in our yaml-format branch back into
main using a fast-forward merge:
OUTPUT
$ git merge yaml-format
Updating ec240ab..68b09d0
Fast-forward
 guacamole.md   | 7 -------
 guacamole.yaml | 6 ++++++
 2 files changed, 6 insertions(+), 7 deletions(-)
 delete mode 100644 guacamole.md
 create mode 100644 guacamole.yaml
If we look at the log, we can see that the commits that we made on
the yaml-format branch are now a part of the
main branch:
OUTPUT
$ git log --oneline --graph
68b09d0 (HEAD -> main, yaml-format) Rename recipe file to use .yaml extension.
a2b55be Reformat recipe to use YAML.
ec240ab Ignore png files and the pictures folder.
20c856c Write prices for ingredients and their source
11cdb65 Add some initial cakes
7cdeaef Modify guacamole to the traditional recipe
4b58094 Add ingredients for basic guacamole
cdb0c21 Create initial structure for a Guacamole recipeNote that our old branch is stil there!
OUTPUT
$ git branch -avv
* main        68b09d0 Rename recipe file to use .yaml extension.
  yaml-format 68b09d0 Rename recipe file to use .yaml extension.
It’s just that both branches now point to the same commit. Until we specifically delete the branch, it will remain in the repository.
If using the fast-forward merge, it is impossible to see from the
git history which of the commit objects together have
implemented a feature. You would have to manually read all the log
messages. Reverting a whole feature (i.e. a group of commits), is a true
headache in the latter situation, whereas it is easily done if the
–no-ff flag was used.
For a good illustration of fast-forward merge (and other concepts), see this thread: https://stackoverflow.com/questions/9069061/what-effect-does-the-no-ff-flag-have-for-git-merge
Non-fast-forward Merge
A non fast-forward merge makes a new commit that ties together the histories of both branches.
Let’s make a new branch and add a commit to it:
Now, let’s move back to the main branch and merge the changes from
the add-instructions branch using a non-fast-forward
merge:
BASH
git switch main
git merge --no-ff add-instructions -m "Merge add-instructions branch into main."
OUTPUT
$ git merge --no-ff add-instructions -m "Merge add-instructions branch into main."
Merge made by the 'ort' strategy.
 guacamole.yaml | 4 +++-
 1 file changed, 3 insertions(+), 1 deletion(-)
Let’s look at the log to see what happened:
OUTPUT
$ git log --oneline --graph
$ git log --oneline --graph
*   a20b39f (HEAD -> main) Merge add-instructions branch into main.
|\
| * 22e4eb6 (add-instructions) Add instructions to guacamole recipe.
|/
* 68b09d0 (yaml-format) Rename recipe file to use .yaml extension.
* a2b55be Reformat recipe to use YAML.
The --no-ff flag causes the merge to always create a new
commit object, even if the merge could be performed with a fast-forward.
This avoids losing information about the historical existence of a
feature branch and groups together all commits that together added the
feature.
Merge Conflicts
When merging branches, it’s not uncommon to encounter a “merge conflict”. This happens when the same part of the same has been modified in both the source and target branches. In these cases, git will pause the merge and ask you to resolve the conflict manually.
Let’s create a conflict by modifying the same line in both branches.
BASH
git switch main
git branch modify-guac-instructions
git switch modify-guac-instructions
nano guacamole.yaml
And let’s change the final step to something more informative:
YAML
instructions: |
  1. Cut avocados in half and remove pit.
  2. Slice the avocados and mash them with a fork.
Commit the change:
Now, let’s switch back to the main branch and modify the
same line differently:
Change the final step to:
YAML
instructions: |
  1. Cut avocados in half and remove pit.
  2. Use a food processor to blend the avocados.
Commit the change:
BASH
git add guacamole.yaml
git commit -m "Modify guacamole instructions to include food processor."
Now, let’s try to merge the modify-guac-instructions
branch into main:
OUTPUT
$ git merge modify-guac-instructions
Auto-merging guacamole.yaml
CONFLICT (content): Merge conflict in guacamole.yaml
Automatic merge failed; fix conflicts and then commit the result.
In addition to this message, our branch name in the terminal prompt
may also be prefixed with (main|MERGING) to indicate that
we are in the middle of a merge, and not in the normal flow of git
operations.
Git has marked the conflict in the guacamole.yaml file.
Let’s open it to see what happened:
nano guacamole.yamlYAML
name: Guacamole
ingredients:
  avocado: 1.35
  lime: 0.64
  salt: 2
instructions: |
  1. Cut avocados in half and remove pit.
<<<<<< HEAD
  2. Use a food processor to blend the avocados.
=======
  2. Slice the avocados and mash them with a fork.
>>>>>> modify-guac-instructions
The lines between <<<<<< HEAD and
======= show the changes from the main branch,
while the lines between ======= and
>>>>>> modify-guac-instructions show the
changes from the modify-guac-instructions branch.
There are tools and editors that can help you resolve merge conflicts, but at its core, all we need to do is decide which changes to keep. We can keep one side, the other side, or even combine both changes.
You can resolve the conflict however you like - as long as the final file is valid and no longer contains the merge conflict markers.
Upon saving the file, however, the merge is not yet complete. We need to stage the resolved file and commit the merge:
We can see the branch / merge process in our log:
OUTPUT
$ git log --oneline --graph
*   a94e041 (HEAD -> main) Resolve merge conflict in guacamole.yaml.
|\
| * 21be5b1 (modify-guac-instructions) Modify guacamole instructions mashing.
* | c6ae196 Modify guacamole instructions to include food processor.
|/
*   d6ade9c Merge add-instructions branch into main.
|\
| * 4d1c414 (add-instructions) Add instructions to guacamole recipe.
|/
* f36de20 (yaml-format) Rename recipe file to use .yaml extension.
...Exercise: Creating a fast-forward merge.
Create a branch in your repository for finishing the guacamole recipe
by adding instructions. Then, merge the branch back into
main using a fast-forward merge.
Exercise: Resolving a merge conflict.
Create a merge conflict by modifying the same line in both the
main branch and a new branch. Then, merge the new branch
into main, resolve the conflict, and complete the
merge.
This is free-form, so there is no single correct solution.
BASH
git switch main
nano salsa.md
git add salsa.md
git commit -m "Add initial salsa recipe."
git branch modify-salsa
git switch modify-salsa
nano salsa.md
git add salsa.md
git commit -m "Modify salsa recipe to include tomatoes."
git switch main
nano salsa.md
git add salsa.md
git commit -m "Modify salsa recipe to include onions."
git merge modify-salsa
# Resolve the conflict in salsa.md
git add salsa.md
git commit -m "Resolve merge conflict in salsa.md."
Three-way Merge
Similar to --no-ff, but there may be dragons. Forced
upon you when there’s an intermediate change since you branched. May
prompt you to manually resolve
See https://git-scm.com/docs/merge-strategies for a zillion options (“patience”, “octopus”, etc), But also git is only so smart and you are probably smarter.
There are a number of external tools that have a graphical interface to allow for merge conflict resolution. Some of these include: kdiff3 (Windows, Mac, Linux), Meld (Windows, Linux), P4Merge (Windows, Mac, Linux), opendiff (Mac), vimdiff (for Vim users), Beyond Compare, GitHub web interface. We do not endorse any of them and use at your own risk. In any case, using a graphical interface does not substitute for understanding what is happening under the hood.
-
git merge --no-ffis the best way to merge changes -
git merge --ff-onlyis a good way to pull down changes from remote - merge conflicts happen when the same part of the same file has been modified in both branches
- merge conflicts must be resolved manually
Content from Branching Models
Last updated on 2025-12-03 | Edit this page
Estimated time: 0 minutes
Overview
Questions
- What is a branching model?
- Why do you need one?
- What are the most common branching models?
Objectives
- Learn about the importance of a branching model.
What is a branching model/strategy?
Branches are primarily used as a means for teams to develop features giving them a separate workspace for their code. These branches are usually merged back to a master branch upon completion of work. In this way, features (and any bug and bug fixes) are kept apart from each other allowing you to fix mistakes more easily.
This means that branches protect the mainline of code and any changes made to any given branch don’t affect other developers.
A branching strategy, therefore, is the strategy that software development teams adopt when writing, merging and deploying code when using a version control system.
It is essentially a set of rules that developers can follow to stipulate how they interact with a shared codebase.
Such a strategy is necessary as it helps keep repositories organized to avoid errors in the application and the dreaded merge hell when multiple developers are working simultaneously and are all adding their changes at the same time. Such merge conflicts would eventually deter the combination of contributions from multiple developers.
Thus, adhering to a branching strategy will help solve this issue so that developers can work together without stepping on each other’s toes. In other words, it enables teams to work in parallel to achieve faster releases and fewer conflicts by creating a clear process when making changes to source control.
When we talk about branches, we are referring to independent lines of code that branch off the master branch, allowing developers to work independently before merging their changes back to the code base.
In this and the following episodes, we will outline some of the branching strategies that teams use in order to organize their workflow where we will look at their pros and cons and which strategy you should choose based on your needs, objectives and your team’s capabilities.
Why do you need a branching model?
As mentioned above, having a branching model is necessary to avoid conflicts when merging and to allow for the easier integration of changes into the master trunk.
A BRANCHING MODEL AIMS TO: - Enhance productivity by ensuring proper coordination among developers - Enable parallel development - Help organize a series of planned, structured releases - Map a clear path when making changes to software through to production - Maintain a bug-free code where developers can quickly fix issues and get these changes back to production without disrupting the development workflow
Git Branching Models
Some version control systems are Very Opinionated about the branching
models that can be used. git is very much (fortunately or
unfortunately) not. This means that there are many different ways to do
development in a team and the team needs to explicitly agree on how and
when to merge contributions to the main branch. So the first rule of
git branching is: “Talk about your branching model.” The
second rule is: “Talk about your branching model.” If in doubt, do what
other people around you are doing. If they don’t do anything, call a
friend.
That said, there are a number of established (and less so) branching
models that are used with git. These include, but are not
limited to:
Centralized workflow: enables all team members to make changes directly to the main branch. Every change is logged into the history. In this workflow, the contributors do not use other branches. Instead they all make changes on the main branch directly and commit to it. This woks for individual developers or small teams which communicate very well, but can be tricky for larger teams: the code is in constant state of flux and developers keep changes local until they are ready to release.
Trunk-based development (cactus flow?): is somewhat similar to the centralized workflow. The development happens on a single branch called
trunk. When changes need to be merged, each developer pulls and rebases from the trunk branch and resolves conflicts locally. This can work if small merges are made frequently and is more successful if there is CI/CD.Feature branch workflow: every small change or “feature” gets its own branch where the developers make changes. Once the feature is done, they submit a merge/pull request and merge it into the main branch. Features branches should be relatively short-lived. The benefit of this model is that the main branch is not polluted by unfinished features. Good for teams.
Gitflow: is a model where the main development happens in a develop branch with feature branches. When the develop branch is ready for a release (or to go into production), a team member creates a release branch which is tested and eventually merged onto the develop and eventually main branch.
GitHub flow (https://docs.github.com/en/get-started/quickstart/github-flow): similar to the branching workflow.
GitLab flow: is a simplified version of Gitflow (https://about.gitlab.com/topics/version-control/what-is-gitlab-flow/)
Oneflow: is similar to Gitflow but relies on the maintenance of one long-lived branch. It is meant to be simpler, without a develop branch but feature branches still exist (https://www.endoflineblog.com/oneflow-a-git-branching-model-and-workflow).
Forking workflow (e.g. astropy): is a model where each contributor creates a
forkor a complete copy of the repository. Every contributor effectively has two repositories: his own and the main (upstream) one. Changes are made as pull requests against the main repository. This model is popular with open source projects because the vast majority of contributors do not need to have privileges in the main repository.
A longer description of some of these can be found here: https://about.gitlab.com/topics/version-control/what-is-git-workflow/#feature-branching-git-workflow
In summary, there are many different ways to collaborate on a project. Look at the pros and cons and select one that fits the needs and organization of your team and project. In the following several sections we look at some of these models in more detail.
- A branching model is a pre-agreed way of merging branches into the main branch.
- A branching model is needed when multiple contributors are making changes to a single project.
Content from Forking Workflow
Last updated on 2026-07-15 | Edit this page
Estimated time: 0 minutes
Overview
Questions
- What are the common workflows of the forking branching model?
Objectives
- Use the forking workflow to contribute to a project.
Preparation: Make sure that the main is clean, everything is committed.
The forking workflow is popular among open source software projects and often used in conjunction with a branching model.
The main advantage is that you enable people external to your project to implement and suggest changes to your project without the need to give them push access to your project. In this workflow developers usually interact with multiple (at least two) repositories and remotes: the original code repository and the forked repository. It is important to understand that a fork represents a complete copy of a remote repository.
In order to understand the forking workflow, let’s first take a look at some special words and roles needed:
- upstream - Remote repository containing the “original copy”
- origin - Remote repository containing the forked copy
- pull request (PR) / merge request (MR) - Request to merge changes from fork to upstream (a request to add your suggestions to the “original copy”)
- maintainer - Someone with write access to upstream who vets PRs/MRs
- contributor - Someone who contributes to upstream via PRs/MRs
- release manager - A maintainer who also oversees releases
In this workflow changes are suggested and integrated into the “upstream main” branch via a pull/merge request from an “origin branch” (and not the “origin main”). The “origin main” branch is updated by pulling changes from the “upstream main” as they become available.
This way the “upstream main” remains the true source for any suggested change in the project, while allowing anyone to work on their own contributions independently.
Pull requests / merge requests are a service of the hosting platform to ease code reviews and managing changes. They only work within the same hosting service, while you certainly have remotes on several hosting services configured for a repository.

The main workflow
Once you discover a hosted Git project that you want to contribute to, you can create a fork of this repository.


After clicking fork you can choose in which group you want
to fork in. Only groups where you have write access will be listed.
Depending on the branching model of the upstream repository, you may
want to copy only the main branch (or rather the branch set
as the default branch). For most repositories a full copy
will be the best choice, especially if the upstream repository uses a
more complex branching model.
Cloning the forked copy
After the fork is complete, you clone the repository as you would with any other personal project repository. Your copy will then use the remote name origin.
On you cloned working copy you should then create a branch for your proposed changes.
You should avoid changing the main branch of your local
repository, as this should only be your reference to the upstream
main branch, which eventually be providing updates (i.e.,
new commits). If you change your local main branch, its
history will diverge from the upstream’s history of the
main branch causing problems in the future.
Make changes and push branch to your fork
After you cloned the forked repository, you interact with it just the way you would with a repository of your own. In fact, the forked copy now is your own, as you have full access control over the forked project. Remember to only work on branches.
Create a pull request
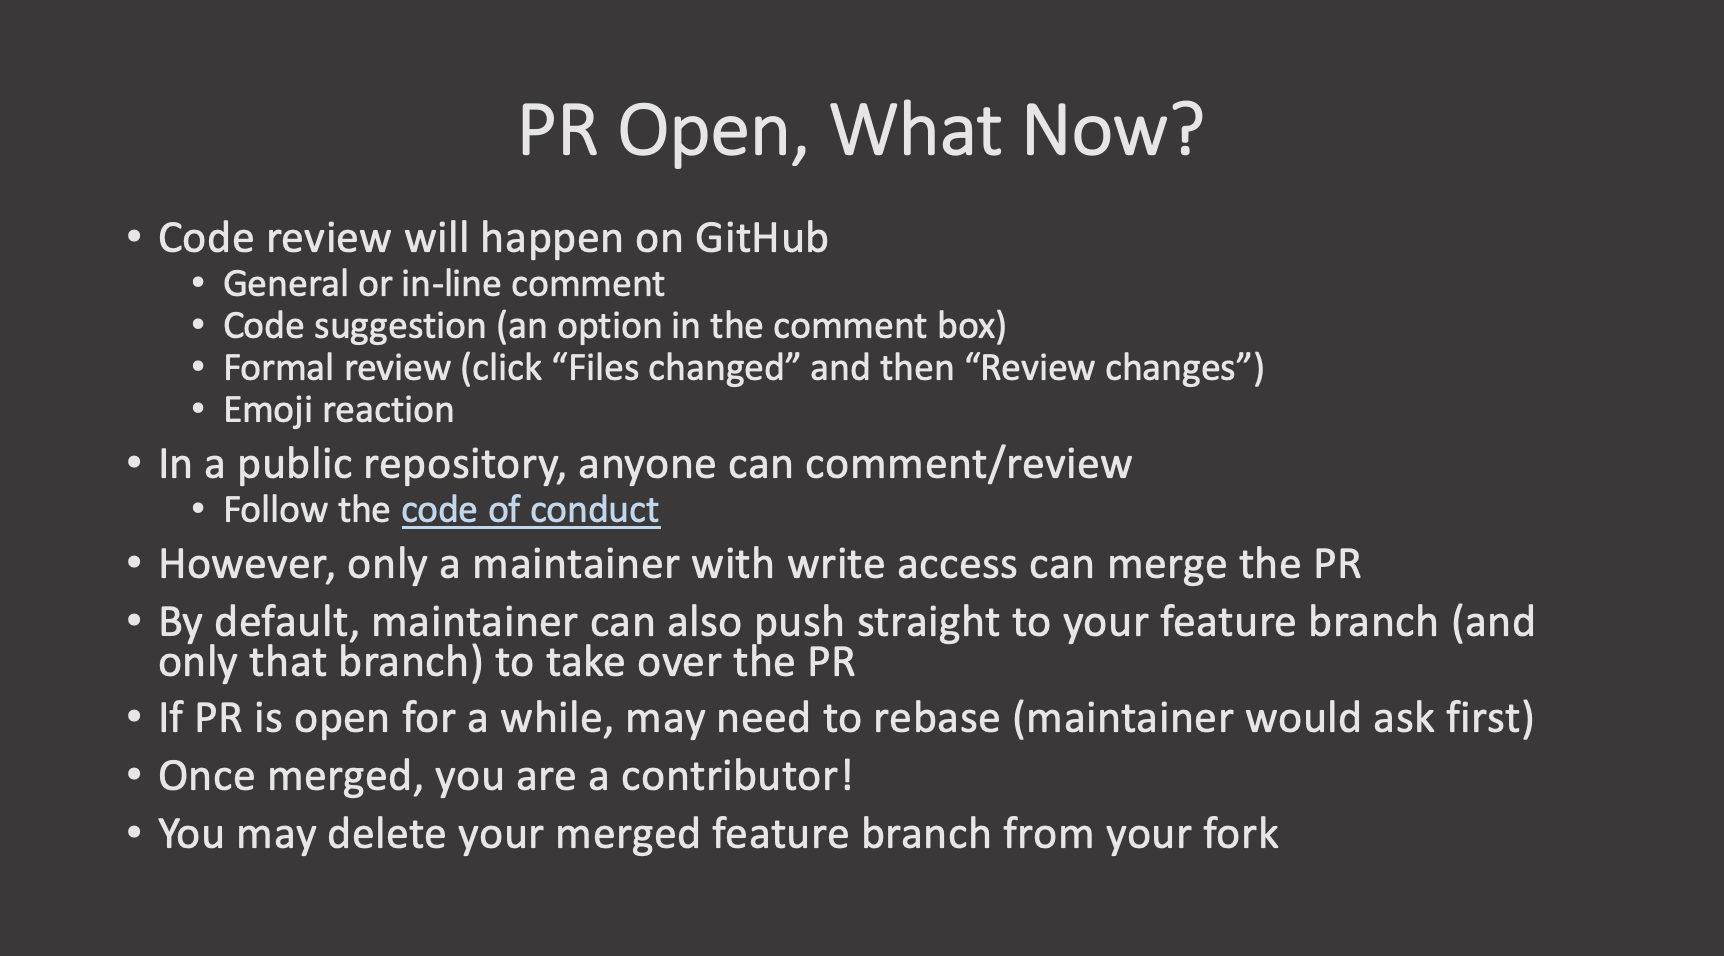
After pushing your branch onto your own fork, you can create a pull request in order to propose your modifications to the original repository. The maintainers of the project will review the changes and may ask for additional changes before merging them into the upstream repository.
Exercise 1: Full fork-to-pull-request example
Complete the main forking workflow once for your project.
- Fork a repository named by the workshop instructors.
- Clone the repository
- Create a new branch for the changes
- Add and commit a change
- Push branch to origin as the tracking branch
Keeping up-to-date
You may either want to continue to contribute to the forked project, or the forked project has received updates before your changes could be merged. Either way, you will want to incorporate the upstream changes into the corresponding branches both in the forked repository and your working copy. For this it is best to add the original source, the upstream as a remote.
As you never modify the main branch, it remains straight
forward to pull in any change from upstream. First you switch to the
main branch of your working copy, pull in changes directly from
upstream main, and push them to your forked
repository on origin.
Updating your branch is a bit more intricate. Here, we want our
contributed changes to be the last on the branch, so we need to
rebase the branch. When we rebase the branch to the
newest commits on main, the history of the origin
branch and the working copy branch will have
diverged and you will have to update the origin
branch by force.
BASH
git switch mybranch
git pull --rebase upstream main
# resolve potential conflicts
git push --force origin mybranchForce-pushing to a remote branch will invalidate any other copies of
that branch in other people’s working copies. This, it is usually a bad
idea to force-push on branches actually worked on by others. In that
case, just merge the changes with git pull upstream main
creating a merge commit.
The reason why some people prefer the rebase over the merge is that it keeps the history cleaner.The merge commits It therefore remains a judgement call and will largely be influenced by the specific policies in place for the repositories of the projects you collaborate with.
Exercise 2: Keeping things up-to-date
Update the copies of your main branch after the
successful merge of the pull request.
You can do this with the UI of the hosting service, but try to use the command line.
- The forking workflow allows third parties to prepare and propose changes without write access to the upstream repository
- The
mainbranch is not modified but only be updated from the upstreammainbranch - Branch off
mainto a feature branch, pushing to the forked repository (origin) - Update forked
mainbranch usinggit pull upstream mainwhereupstreamis the name of the upstream remote - Update your local feature branch by
git pull --rebase upstream main - Force push to origin branch for pull request updates.
Content from Data Science Workflow
Last updated on 2025-11-21 | Edit this page
Estimated time: 0 minutes
Overview
Questions
- What are the common workflows of the Data Science branching model?
Objectives
- First learning objective. (FIXME)
 ::::::::::::::::::::::::::::::::::::::::
keypoints
::::::::::::::::::::::::::::::::::::::::
keypoints
- First key point. Brief Answer to questions. (FIXME)
::::::::::::::::::::::::::::::::::::::::::::::::::
{% include links.md %}
Content from Large Files
Last updated on 2026-07-15 | Edit this page
Estimated time: 0 minutes
Overview
Questions
- Why are (large) binary files a problem in Git?
- What is Git LFS?
- What are the problems with Git LFS?
Objectives
- Understanding that Git is not intended for (large) binary files
- Learning about the
git lfscommands - Understanding the disadvantages of
git lfs
Sometimes, you might want to add non-textual data to your Git repositories. Examples for such uses cases in a software project are e.g.
- assets for the project documentation like images
- test data for your test suite
However, such data is stored in binary formats most of the time.
Git’s line-based approach of tracking changes is not suited for this
type of data. While Git will work with binary data without any errors,
it will internally treat each binary file as a file with one (very long)
single line of content. Consequently, if you apply changes to such a
file, Git will store the entire file in the commit even if there was a
lot of similarity between the two versions of the file. As Git does not
“forget” about previous versions of the file, doing this repeatedly
and/or with very large files will quickly make your repository grow in
size. At some point this will severely impact the performance of all
your Git operations from git clone to even
git status. It is therefore generally discouraged
to use Git to track (large) binary files.
However, the problem of binary files in Git repositories cannot be fully neglected: There is a lot of value for a software project in keeping things together that belong together: Documentation assets belong to the documentation they are part of. Therefore we will now explore some options on how to integrate large file handling into Git.
The git lfs subcommand is part of an extension to Git.
LFS stands for Large File
Storage. It allows you to mark individual files as
being large. Git does not apply its normal, line-based approach
to tracking changes to these large files, instead they are stored
separately and only referenced in the Git data model. During push and
pull operations, large files are transmitted separately - requiring the
server to support this operation.
For the sake of demonstration, we create a file called
report.pdf. We assume that it is a large, binary file in
order to show how to handle it with git lfs:
First, we need to install LFS. This is something that should only be done once per machine.
Next, we tell Git, that this file should be treated with LFS:
Tracking "report.pdf"Having done so, we can inspect the repository and we learn that a new
file .gitattributes was added to the repository.
On branch main

Untracked files:
  (use "git add <file>..." to include in what will be committed)
	.gitattributes
report.pdfreport.pdf filter=lfs diff=lfs merge=lfs -textSimilar to .gitignore this file is part of the
repository itself in order to share it with all your collaborators on
this project. We therefore craft a commit that contains it:
Now, we are ready to add the large file to the repository the same way we would with any other file:
Pushing our commits to the remote repository, we can see in the console output, that our LFS data was transferred to the remote server separately.
Uploading LFS objects: 100% (1/1), 17 B | 0 B/s, done.Tracking with wildcard patterns
LFS tracking is not limited to explicitly spelled out filenames.
Instead, wildcard patterns can be passed to git lfs track.
However, you should be careful to quote these patterns, as they might
otherwise get expanded by your shell. For example, tracking all PDFs
with LFS could be achieved with the following command:
Disadvantages of Git LFS
Although git lfs by design solves the problem of storing
large files in Git repositories, there are some practical hurdles that
you should consider before introducing LFS into your project:
- The
git lfscommand is a separately maintained extension to the Git core. It is therefore not part of most Git distributions, but needs to be installed separately. Using it in your project will require you to educate your users about LFS and how to install it. Depending on your target audience, you should carefully consider whether the benefits outweigh this disadvantage. - Users that do not have
git lfsinstalled will not be notified by Git. They will see the files, but the content will be Git metadata instead of the actual content. Trying to work with those files will typically produce cryptic error messages. - Some hosting providers - most notably GitHub - apply restrictive quotas to LFS storage. On the free plan, GitHub currently allows 1GB of storage and 1 GB bandwidth per month. As the band width quota counts every single clone by users, LFS should currently be considered unusable on the GitHub free plan.
- (Large) binary files can grow the repository size immensely and make it unusable
-
git lfsis an extension that stores large files outside the Git data model - Use of Git LFS is discouraged in many scenarios.
Content from Undo, Move, cherry-pick
Last updated on 2026-07-15 | Edit this page
Estimated time: 0 minutes
Overview
Questions
- How to incorporate specific changes in one branch into another?
Objectives
- Learn to pick and incorporate specific changes into a different branch.
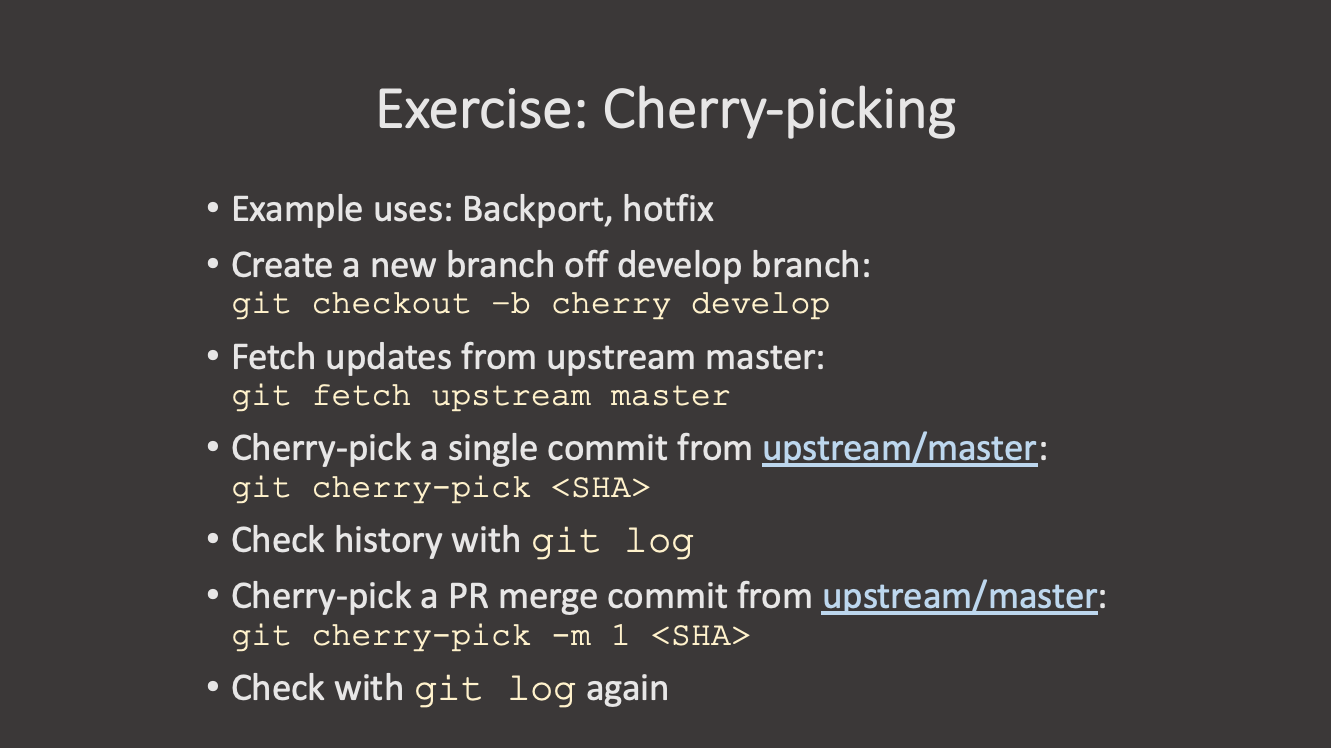
What is a cherry-pick?
If there is a specific change present in a different branch that you need in another branch, Git lets you “cherry-pick” those commits. The “cherry-pick” command is a way of copying a specific commit from one branch to another. Each commit in git has a specific identifier (the “hash” or “SHA” of the commit) that we can use to refer to that exact commit. You can see the hash of your recent commits by running:
Note that this only shows the commits that are present on this “branch”. If you want to see commits from all branches, you can run:
or checkout the specific branch you want to see.
So why would I want to cherry-pick a commit?
- Imagine you have a branch where you are working on a new feature. You make several commits to this branch, but as you work you realize that one of the commits you just made would be important to include in the “main” branch right away.
- Or maybe you’re working on a branch and realize that the commit you just made would be better suited to a different branch.
- Or maybe you have a branch with several commits, but you realize that you want to split these out into one or more branches.
The more confined and specific commits are, the better they can be cherry-picked.
In these cases, you can use “cherry-pick” to move a specific commit from one branch to another.
How to cherry-pick
The cherry-pick command looks like this:
Note that we don’t have to provide any information about the source branch, because the commit hashes are unique across the entire repository. Git will find the commit with the specified hash, then apply it to the current branch.
Let’s modify our groceries.md file in our
bean-dip branch:
MARKDOWN
# Market A
* avocado: 1.35 per unit.
* lime: 0.64 per unit
* salt: 2 per kg
* black beans: 0.99 per canWait though! We actually want this change to happen in the
main branch instead. We can switch to the main
branch and cherry-pick the commit we just made in the
bean-dip branch:
Use git log --oneline in the bean-dip
branch to find the commit hash of the commit we just made:
OUTPUT
$ git log --oneline
4a473c9 (HEAD -> bean-dip) Add bean dip ingredients to groceries
b8732e4 Add bean dip recipe
79cb366 (origin/bean-dip) Add bean dip recipe.
(Your commit hash will be different.)
Now switch to the main branch and cherry-pick that
commit:
OUTPUT
$ git cherry-pick 4a473c9
[main 68fbfdc] Add bean dip ingredients to groceries
 Date: Thu Nov 27 23:11:28 2025 +0100
 1 file changed, 1 insertion(+), 1 deletion(-)
The command will then apply the changes only from the specified commit to the current branch, creating a new commit with those changes.
Undoing a cherry-pick
If you cherry-pick a commit and then realize that you made a mistake,
you can undo the cherry-pick using the git reset command we
showed earlier:
Issues with cherry-pick
cherry-picking is an infrequent operation, and it can lead to some issues if not used carefully. Some things to keep in mind:
- You are creating a new commit on the branch, which means that if the original commit is later merged into the branch, you may end up with a merge conflict.
- If the commit you are cherry-picking depends on other commits that are not present in the target branch, you may run into issues when trying to apply the changes or run the code.
- The new commit will look identical to the old commit, but with a different hash. This can make it difficult to visually track changes across branches.
Cherry-picking Exercise
Create a new branch called cookies and add a recipe for
chocolate chip cookies to a new file
cookies/chocolate-chip-cookies.md. Commit this file. Then
add one of the ingredients for your cookies to the
groceries.md file in the same branch. Finally, add the
instructions for the cookies in another commit.
How can you get just the change to groceries.md into the
main branch?
- Create and switch to the
cookiesbranch:
- Create the recipe file and add the recipe:
Make your changes to
chocolate-chip-cookies.mdandgroceries.md, committing each change.Use
git log --onelineto find the commit hash for the change togroceries.md.Switch to the
mainbranch and cherry-pick the commit:
Cherry Pick a Range of Commits
Switch to your cookies branch again. Now let’s create the following file:
Then in groceries.md, add the sugar to the end of the
file and commit this change.
In another commit, add flour and butter to groceries.md
and commit this change.
Finally, add the instructions for sugar cookies to the sugar cookie file and commit this change.
Checkout the main branch again. How can you cherry-pick
both of the commits that modified groceries.md into the
main branch?
What is different about cherry-picking a range of commits compared to a single commit?
Run git cherry-pick --help and look at some of the
examples.
- You can cherry-pick specific commits from one branch to another
using
git cherry-pick <commit-hash>.
Content from Interactive Rebase and Squash
Last updated on 2026-07-15 | Edit this page
Estimated time: 0 minutes
Overview
Questions
- Why would I rebase a branch?
- When would I squash commits during a rebase?
Objectives
- Understand the reasons for interactive rebases.
- Remove amending commits from the history.
The process of getting a pull request or merge request accepted and merged into the upstream repository can require several updates to the original proposed changes. These changes may be functional fixes or just changes due to coding policies required for the project. This often results in multiple changes concerning the same piece of the code or document to be both spatially and temporally apart from each other in the Git history. For some projects a cluttered history is not acceptable and you may need to clean up the history.
Git provides a command to modify the history of a branch called an interactive rebase.
We’ve set up a branch that contains multiple commits modifying the same file to demonstrate how to use an interactive rebase to clean up the history.
Let’s first look at the history of our branch
OUTPUT
7c77bba (HEAD -> pie-recipes, origin/pie-recipes) Complete pecan pie recipe instructions
f203cce Additional instructions to pecan pie recipe
c65036e Fix typo in ingredients
8613dde Add recipe for Pecan Pie with ingredients
3f40052 Add Apple Pie recipe
9761864 Initial commit with recipe files
For cleaning up the history we focus on the first 4 commit of the branch.
Git will open an editor with a list of the requested commits in the format
OUTPUT
pick 5df0b61 Add recipe for Pecan Pie with ingredients
pick f34d3e0 Fix typo in ingredients
pick 80e1e0b Additional instructions to pecan pie recipe
pick 376a80c Complete pecan pie recipe instructions

# Rebase deeb7a6..376a80c onto deeb7a6 (4 commands)
#
# Commands:
# p, pick <commit> = use commit
# r, reword <commit> = use commit, but edit the commit message
# e, edit <commit> = use commit, but stop for amending
# s, squash <commit> = use commit, but meld into previous commit
# f, fixup [-C | -c] <commit> = like "squash" but keep only the previous
#                    commit's log message, unless -C is used, in which case
#                    keep only this commit's message; -c is same as -C but
#                    opens the editor
# x, exec <command> = run command (the rest of the line) using shell
# b, break = stop here (continue rebase later with 'git rebase --continue')
# d, drop <commit> = remove commit
# l, label <label> = label current HEAD with a name
# t, reset <label> = reset HEAD to a label
# m, merge [-C <commit> | -c <commit>] <label> [# <oneline>]
# .       create a merge commit using the original merge commit's
# .       message (or the oneline, if no original merge commit was
# .       specified); use -c <commit> to reword the commit message
#
# These lines can be re-ordered; they are executed from top to bottom.
#
# If you remove a line here THAT COMMIT WILL BE LOST.
#
# However, if you remove everything, the rebase will be aborted.
#
Git provides different options for <cmd> to modify
the specific commit. Below you find a selection of commands that are
most often used in basic interactive rebasing.
- pick: Use this commit
- reword: Use this commit, but adapt the commit message
- edit: Use commit, but pause to shell before committing
- squash: Use commit, but as part of the previous commit combining commit messages
- fixup: Like squash, but keep only a single commit message
- drop: Remove commit
Initially all commits are listed with pick, as this would recreate the same state as before the interactive rebase was started. You are now free to change the order of those commits as long as dependencies are retained.
In our example before, we could reorder and squash to keep two commits regarding Pecan Pie.
OUTPUT
pick 8613dde Add recipe for Pecan Pie with ingredients
fixup c65036e Fix typo in ingredients
pick f203cce Additional instructions to pecan pie recipe
pick 7c77bba Complete pecan pie recipe instructions
Now save this list and let Git apply the desired changes. After the rebase is complete, you can look at the rewritten history.
OUTPUT
a03a64c (HEAD -> pie-recipes) Complete pecan pie recipe instructions
6c4a44a Additional instructions to pecan pie recipe
cf155bb Add recipe for Pecan Pie with ingredients
deeb7a6 Add Apple Pie recipe
e4b2098 Initial commit with recipe files
As we have changed the history, the branch at origin has diverged from the local branch. This will be noted in the current status of repository.
git statusOUTPUT
On branch pie-recipes
Your branch and 'origin/pie-recipes' have diverged,
and have 3 and 4 different commits each, respectively.
  (use "git pull" to merge the remote branch into yours)

nothing to commit, working tree clean
As this is the last step before final check and merge, it should be safe to force-push the changes to origin.
OUTPUT
Enumerating objects: 15, done.
Counting objects: 100% (15/15), done.
Delta compression using up to 2 threads
Compressing objects: 100% (12/12), done.
Writing objects: 100% (12/12), 1.29 KiB | 1.29 MiB/s, done.
Total 12 (delta 5), reused 0 (delta 0), pack-reused 0
remote:
remote: To create a merge request for pie-recipes, visit:
remote:   https://gitlab.git.nrw/hartman/git-workshop-practice/-/merge_requests/new?merge_request%5Bsource_branch%5D=pie-recipes
remote:
To https://gitlab.git.nrw/hartman/git-workshop-practice.git
+ 7c77bba...062addc pie-recipes -> pie-recipes (forced update)Exercise 1: Cleaning up history in a feature branch
Clean up the history of your feature branch before the pull request/merge request is merged.
Follow the same steps we did earlier in the lesson:
- Check your branch history:
OUTPUT
 7c77bba (HEAD -> pie-recipes) Complete pecan pie recipe instructions
 f203cce Additional instructions to pecan pie recipe
 c65036e Fix typo in ingredients
 8613dde Add recipe for Pecan Pie with ingredients
 3f40052 Add Apple Pie recipe
9761864 Initial commit with recipe files- Start an interactive rebase for the last 4 commits:
- In the editor, squash the typo fix into the first commit:
BASH
  pick 8613dde Add recipe for Pecan Pie with ingredients
  fixup c65036e Fix typo in ingredients
  pick f203cce Additional instructions to pecan pie recipe
pick 7c77bba Complete pecan pie recipe instructions- Save and exit. Verify the new history:
OUTPUT
  a03a64c (HEAD -> pie-recipes) Complete pecan pie recipe instructions
  6c4a44a Additional instructions to pecan pie recipe
  cf155bb Add recipe for Pecan Pie with ingredients
  3f40052 Add Apple Pie recipe
9761864 Initial commit with recipe files- Force-push the cleaned branch:
Exercise 2: Squashing Commits and Amending
You are working on a pancake recipe and adding ingredients one by
one, each as a separate commit. You can track your history with
git log --oneline at each step.
- Create
pancake.mdand add the following ingredients as separate commits:- flour -> commit message:
Add flour - milk -> commit message:
Add milk - egg -> commit message:
Add eg(this typo is intentional) - Fix the typo in the commit message before moving on.
- flour -> commit message:
To correct only the commit message without touching the files, check
git commit --amend --help.
Exercise 2: Squashing Commits and Amending (continued)
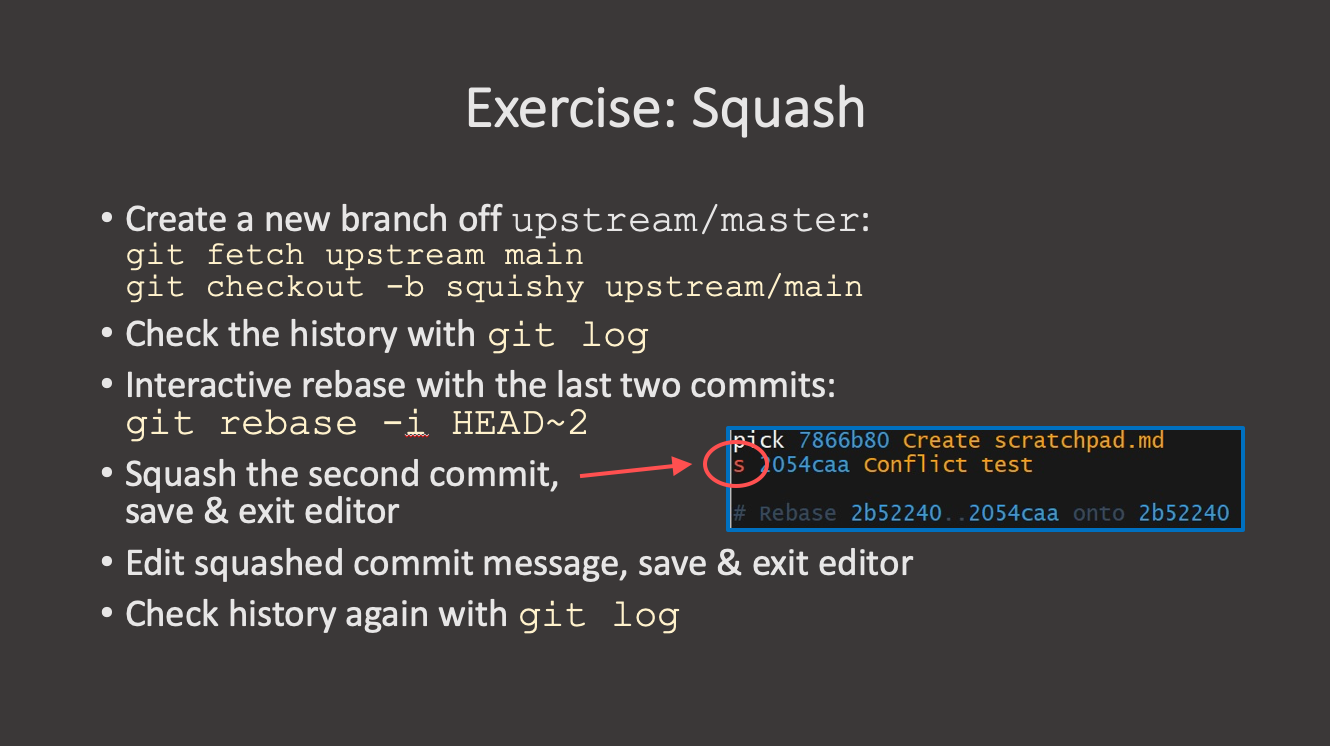
- Squash all three commits into one.
To squash multiple commits, look into git rebase -i.
Exercise 2: Squashing Commits and Amending (continued)
- Oh, you forgot to butter. Add it to
pancake.mdand amend the existing commit without changing the commit message.
Step 1:
BASH
echo "flour" > pancake.md
git add pancake.md
git commit -m "Add flour"

echo "milk" >> pancake.md
git add pancake.md
git commit -m "Add milk"

echo "egg" >> pancake.md
git add pancake.md
git commit -m "Add eg"

git log --oneline
OUTPUT
<hash> (HEAD -> main) Add eg
<hash> Add milk
<hash> Add flourOUTPUT
<hash> (HEAD -> main) Add egg
<hash> Add milk
<hash> Add flour
Step 2:
In the editor, change pick to s for the
last two commits:
Save and exit. In the next editor, write a single commit message:
Add ingredients to pancake recipe
OUTPUT
<hash> (HEAD -> main) Add ingredients to pancake recipeStep 3:
OUTPUT
<hash> (HEAD -> main) Add ingredients to pancake recipe

- Use an interactive rebase to clean up merge requests before the merge.
- Rebased branches need to be force-pushed due to history changes.
- Squashing can be used to combine multiple commits
- Depending on the project policy merge requests may need to be cleaned up before they are allowed upstream.
{% include links.md %}
Content from Hooks
Last updated on 2026-07-15 | Edit this page
Estimated time: 0 minutes
Overview
Questions
- How do I automate checks on my commit?
- How do I check changes before a commit?
Objectives
- Learn about using hooks to improve quality of commits
Git hooks are scripts that get run when a specific event occurs in git. The scripts can be written in any language and do anything you like, so any executable script can be a hook.
Git hooks can trigger events on the server side or locally, and
commonly used hooks include: - pre-commit: Executed before
the git commit command and is usually used to check the
changes with linters or tests. - prepare-commit-msg:
Executed before after the commit message is created, but before the
commit message editor is started. Good for changing the default commit
message programmatically before the user sees it. -
commit-msg: Validates the commit message, can be used to
check whether the commit message adheres to project policies -
post-commit: Runs after the commit, often used for
notifications or logging. - pre-receive: Server-side hook,
which runs before a push is accepted, commonly used to enforce project
policies
Examples of local events that can trigger hooks include
commit (pre- or post-commit hooks), checkout
or rebase. Pre-commit hooks are perhaps the most common and
useful ones: they trigger actions before the code is committed and if
the hook script fails, then the command is aborted. This can be very
powerful - you can automatically run linters, before the code is even
committed.
List of pre-written pre-commit hooks: https://github.com/pre-commit/pre-commit-hooks
The executable files are stored in the .git/hooks/
directory in your project directory. A pre-commit hooks will be an
executable file in this directory stored with the magic name
pre-commit. Check the directory, there are already several
examples.
Before creating the hook, make sure flake8 is installed
in your environment:
Now, let’s create the hook:
And add the following text to it:
#!/usr/bin/env bash

set -eo pipefail
flake8 hello.py
echo "flake8 passed!"
Now let’s make hello.py:
Make the hook file executable, otherwise Git will silently ignore it:
And add some text to it:
The typo is on purpose. Add and commit it to the repository.
Challenge 1: Enforcing commit message format with a hook
Create a file called commit-msg within the directory
.git/hooks/. It must be able to determine if the commit
message is prefixed by feat:, fix:, or
docs:; otherwise, it will prevent the commit from being
made and provide feedback. Run chmod on the file to make it
executable. To test, initially do an attempt at committing using an
invalid message like “updated stuff” and see that it will fail. Then
commit again using a valid commit message such as “feat: add new recipe”
and verify that it succeeds.
The commit-msg hook receives the path to a temporary
file containing the commit message as its first argument. Inside the
script, you can access it with $1. To read the contents of
that file: cat "$1"
You can use grep with regex to check the message format.
For example:
-q runs grep quietly (no output), -E
enables extended regex, and ^(feat|fix|docs): matches lines
that start with one of these three words followed by a colon.
In a hook script, if a command exits with a non-zero status, the
commit is aborted. So exit 1 rejects the commit.
GitHub actions are the equivalent of server-side hooks on GitHub.
There are lots of things that can be done with GitHub actions: https://docs.github.com/en/actions
Here is an example of a simple cron job: https://github.com/mpi-astronomy/XarXiv
Materials: https://verdantfox.com/blog/how-to-use-git-pre-commit-hooks-the-hard-way-and-the-easy-way
- Git provides a list of different hooks for you to run tasks at specific times in the commit
- Use the
pre-commithook to check for change conformity before changes are committed
Content from Setting up the Command Prompt
Last updated on 2025-12-03 | Edit this page
Estimated time: 5 minutes
Overview
Questions
- How can I visualize Git information at a glance in the command prompt?
Objectives
- Improve your command prompt for working with Git
When working with the command prompt in Git, it may prove helpful to keep some information about the repository available at a glance. As Unix shells allow to modify the prompt, a natural approach is to integrate such information into the prompt itself.
What would be useful information to integrate into the prompt?
Take a minute to think about which information might be helpful to be shown as part of the prompt.
- The active branch. As you can switch between different branches of the same repository, it can sometimes be confusing to know which branch your working copy currently reflects. Presenting the branch name as part of the directory name you are currently in may help as a reminder.
- The state of the branch. An indicator on whether there are modified or uncommitted files in the repository may help in noticing uncommitted changes in the repository.
Setting up the query infrastructure
Individual shells have specific ways to define the prompt and the information shown. Select the appropriate code snippet according to the shell you are running. If you are unsure which shell you are using, try the following code to identify the shell you are running.
As the idea to augment the command prompt with Git information is not new, the Git repository on Github (i.e., the repository hosting the source code for Git itself) also provides the shell code to query different information. You can download it to your home directory with the following commands.
BASH
you@computer:~$ curl https://raw.githubusercontent.com/git/git/refs/heads/master/contrib/completion/git-prompt.sh -o $HOME/.git-prompt.shSome shells, such as fish, xonsh, and others already have support for displaying Git repository information built-in.
Now you have the infrastructure set up to augment the command prompt with desired information about your Git repository.
Modifying the prompts
With the code to query the information is already available in the shell session, we still need to use the information in the definition of our prompt.
Tweaking the information shown
Using the git-prompt.sh script you can now tweak the
information shown in the prompt by setting specific environment
variables.
Indicating unstaged and uncommitted changes in the working copy
By setting the environment variable
GIT_PS1_SHOWDIRTYSTATE to a non-empty value, the prompt
will indicate modified files in the working copy with an *
character.
BASH
user@computer:my_repo (main *)> git status
On branch main
Your branch is up to date with 'origin/main'.

Changes not staged for commit:
  (use "git add <file>..." to update what will be committed)
  (use "git restore <file>..." to discard changes in working directory)
        modified:   a_file.py

no changes added to commit (use "git add" and/or "git commit -a")
user@computer:my_repo (main *)$
Indicating untracked files in the working copy
By setting the environment variable
GIT_PS1_SHOWUNTRACKEDFILES to a non-empty value, the prompt
will indicate the presence of untracked files in the working copy with a
% character next to the branch name.
BASH
user@computer:my_repo (main %)> git status
On branch main
Your branch is up to date with 'origin/main'.

Untracked files:
  (use "git add <file>..." to include in what will be committed)
        untracked.pdf

no changes added to commit (use "git add" and/or "git commit -a")
user@computer:my_repo (main %)>
Indicating a stash in the working copy
Git supports saving modifications to the working copy in a so-called
stash that can later be reapplied to the working copy. By setting the
environment variable GIT_PS1_SHOWSTASHSTATE to a nonempty
value, the prompt will indicate wheter something is stashed, with a
$ next to the branch name.
Indicating the name of and difference to the upstream repository
The environment variable GIT_PS1_SHOWUPSTREAM can be set
to a space-separated list of options to show relation of the local
working copy to an upstream repository. For basic use, you can select
between the following options.
- verbose show the number of commits behind (-) or ahead (+) if not equal (=) to upstream.
- name show the abbreviated name of the upstream repository
- auto chooses a sensible set of information depending on the status of the working copy.
BASH
you@itc19060:my_repo (main *)> echo $GIT_PS1_SHOWUPSTREAM

you@computer:my_repo (main *)> GIT_PS1_SHOWUPSTREAM="verbose"
you@computer:my_repo (main *|u+3)> GIT_PS1_SHOWUPSTREAM="verbose name"
you@computer:my_repo (main *|u+3 origin/main)> GIT_PS1_SHOWUPSTREAM="auto"
you@computer:my_repo (main *>)>There are more options for advanced usage available. Check inside of
git-prompt.sh for documentation.
Colorizing the output
If the environment variable GIT_PS1_SHOWCOLORHINTS is
set to any value, the Git-related part of the output in the prompt will
be colorized. If the variable is not set, the output will not be
colourized.
- Use available scripts for common shell environments.
- Indicate changes stashed, pending, or committed to the local working copy.
- Indicate current branch name to aid in multi-branch workflows.
Content from Additional Resources
Last updated on 2025-11-21 | Edit this page
Estimated time: 0 minutes
Overview
Questions
- What didn’t we cover?
Objectives
- Provide pointers to additional topics that are not currently covered
- Provide pointers to additional resources available
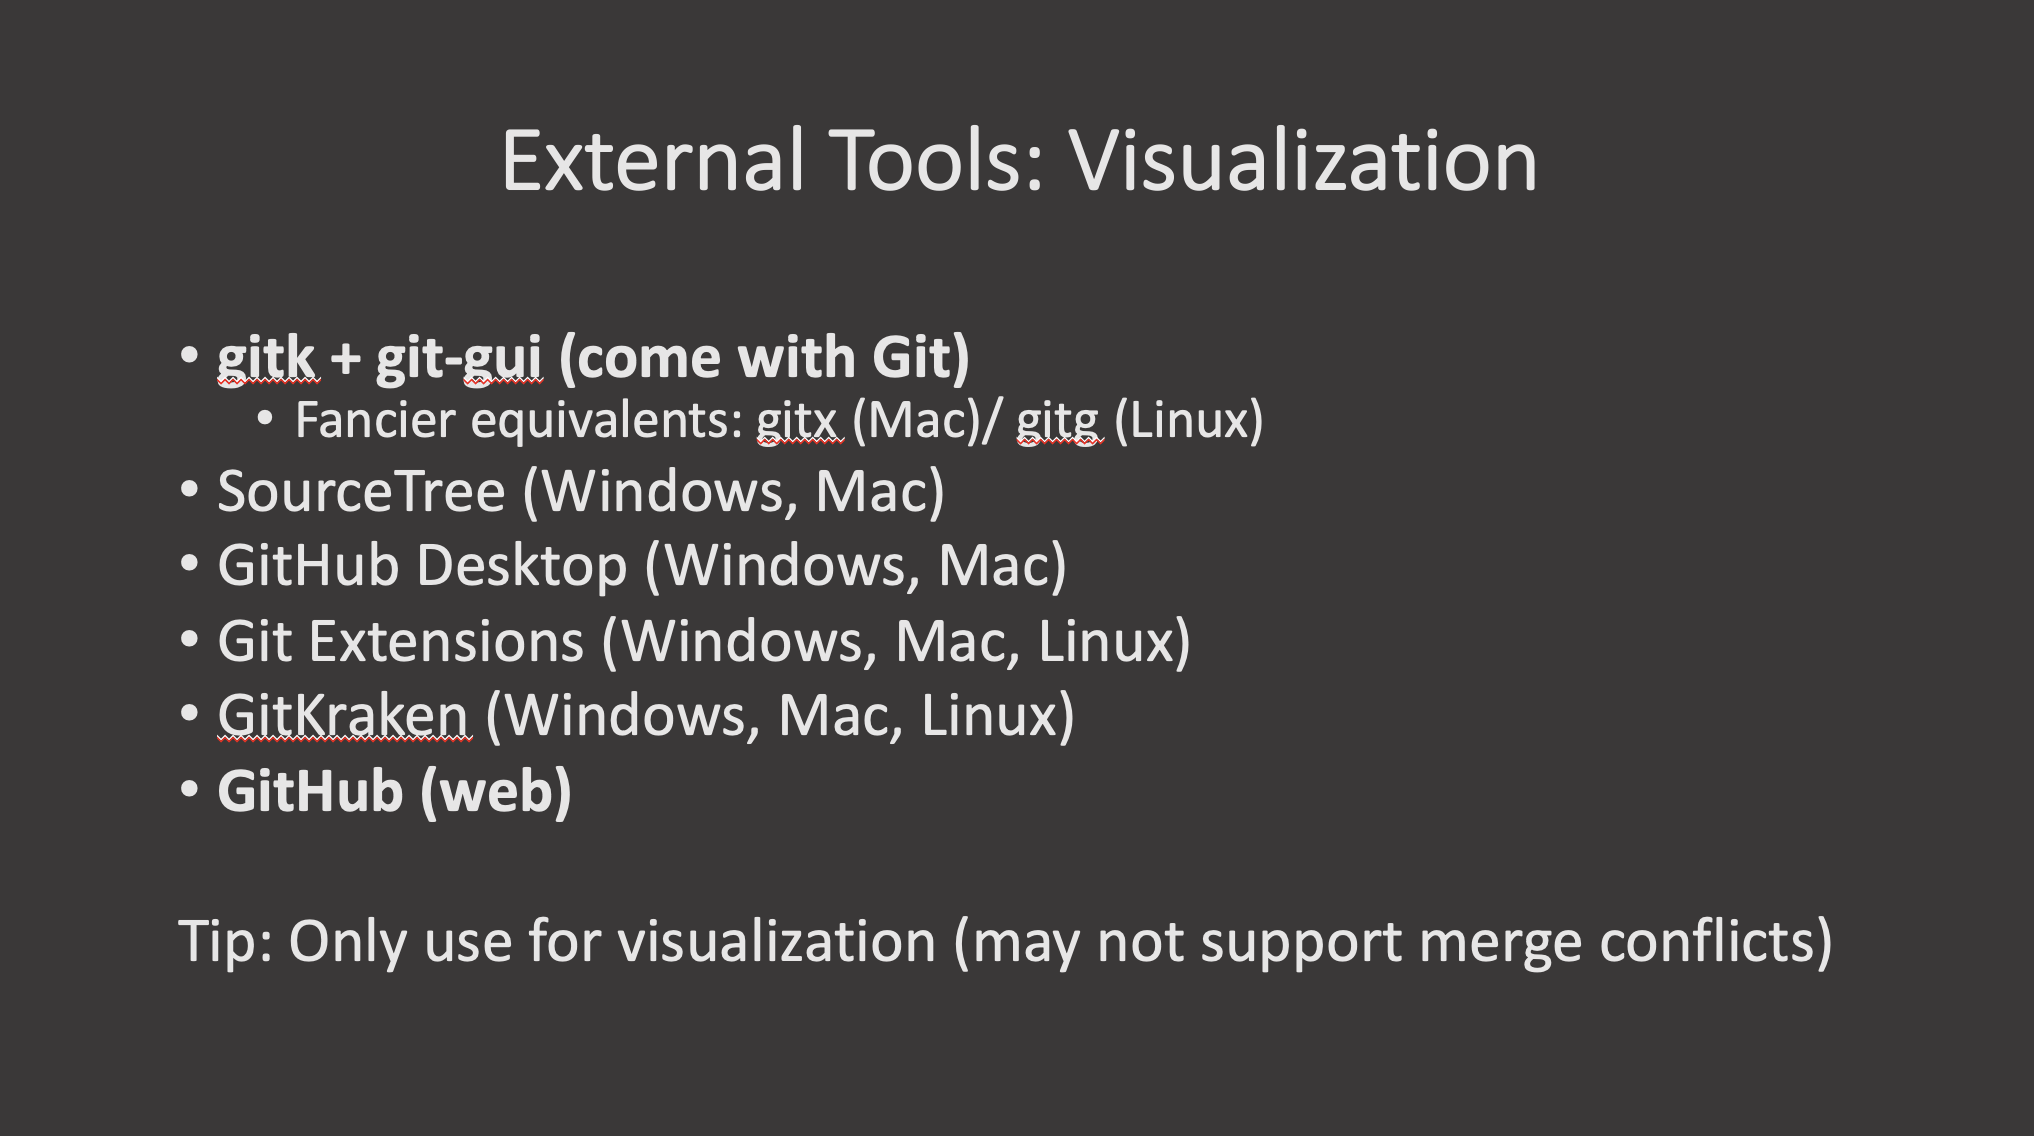
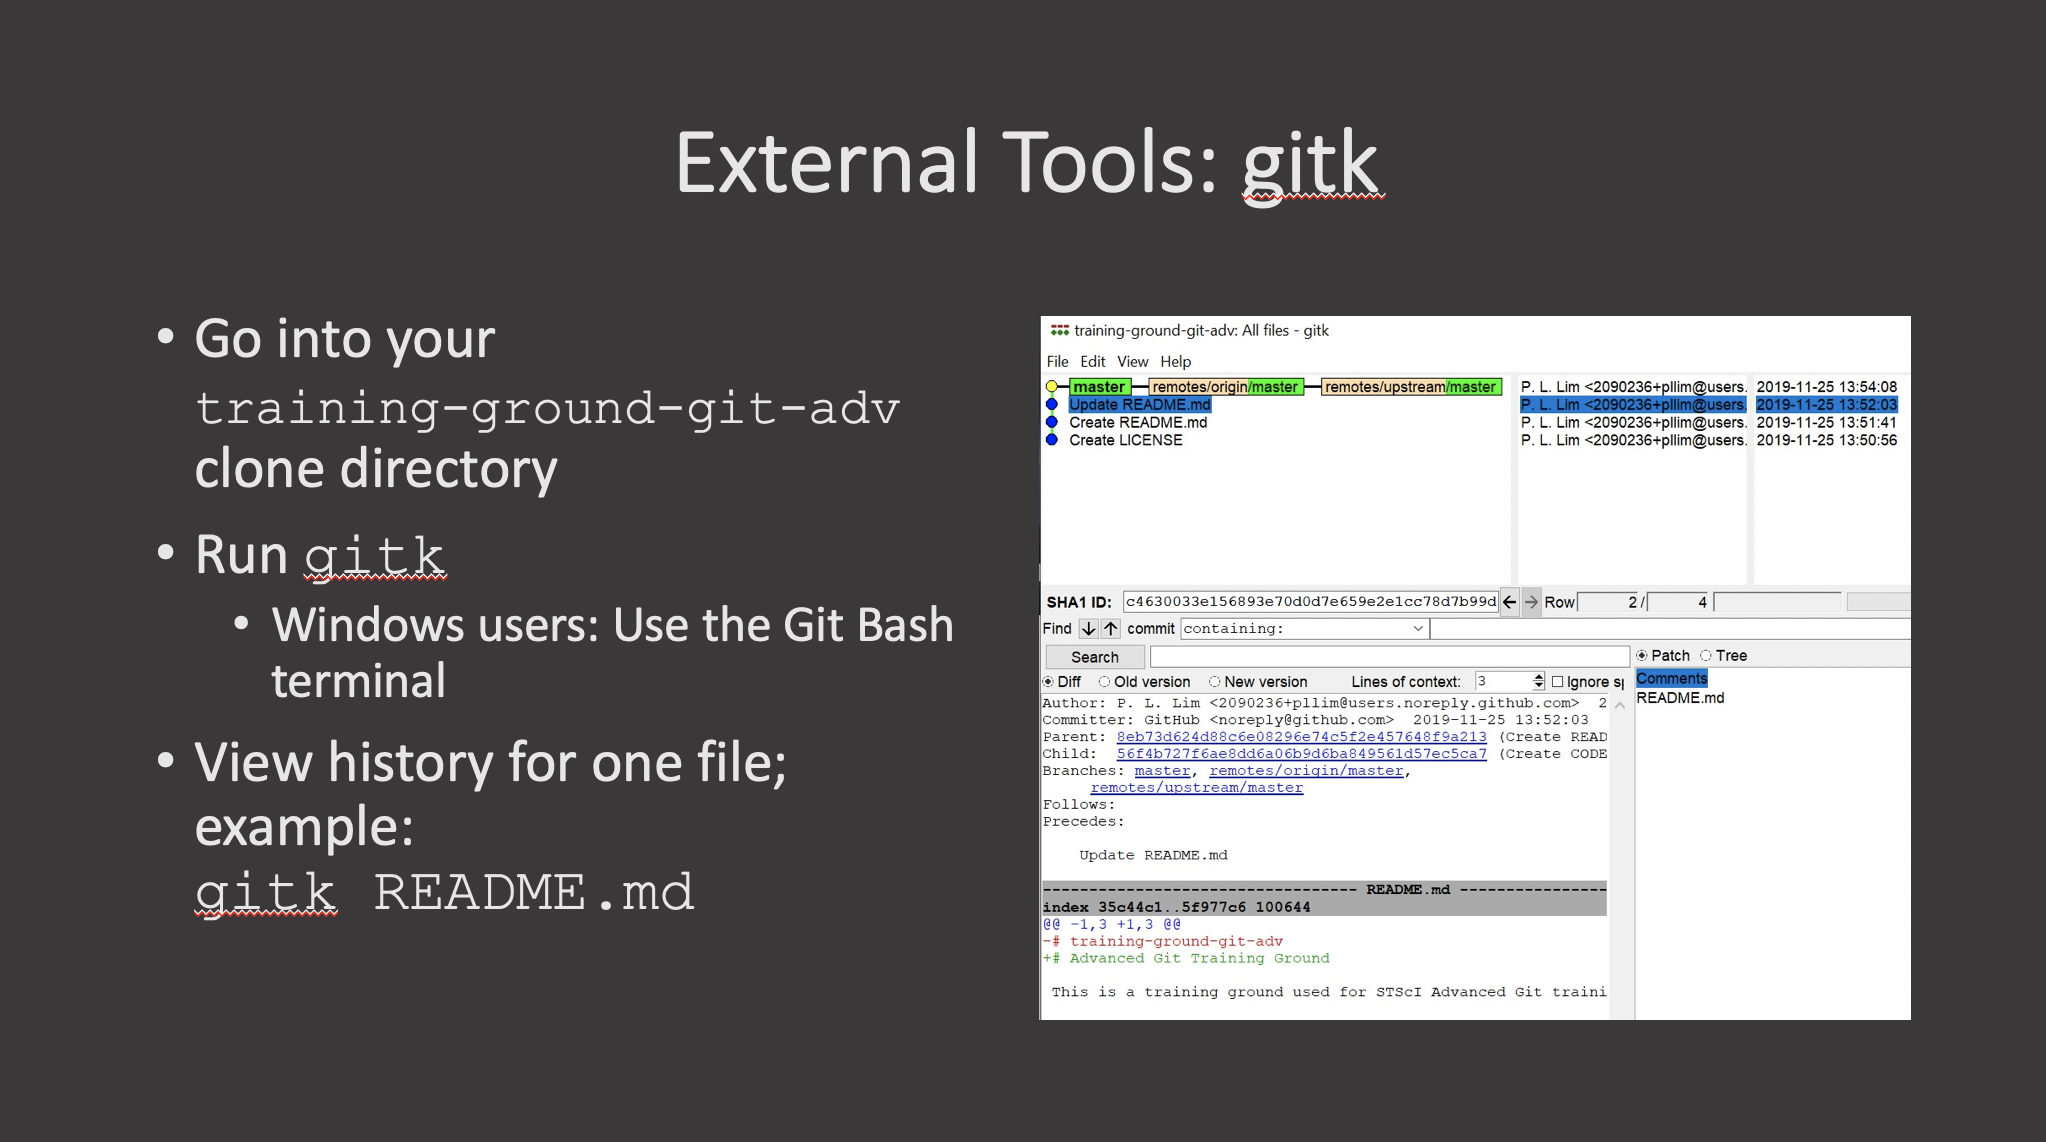
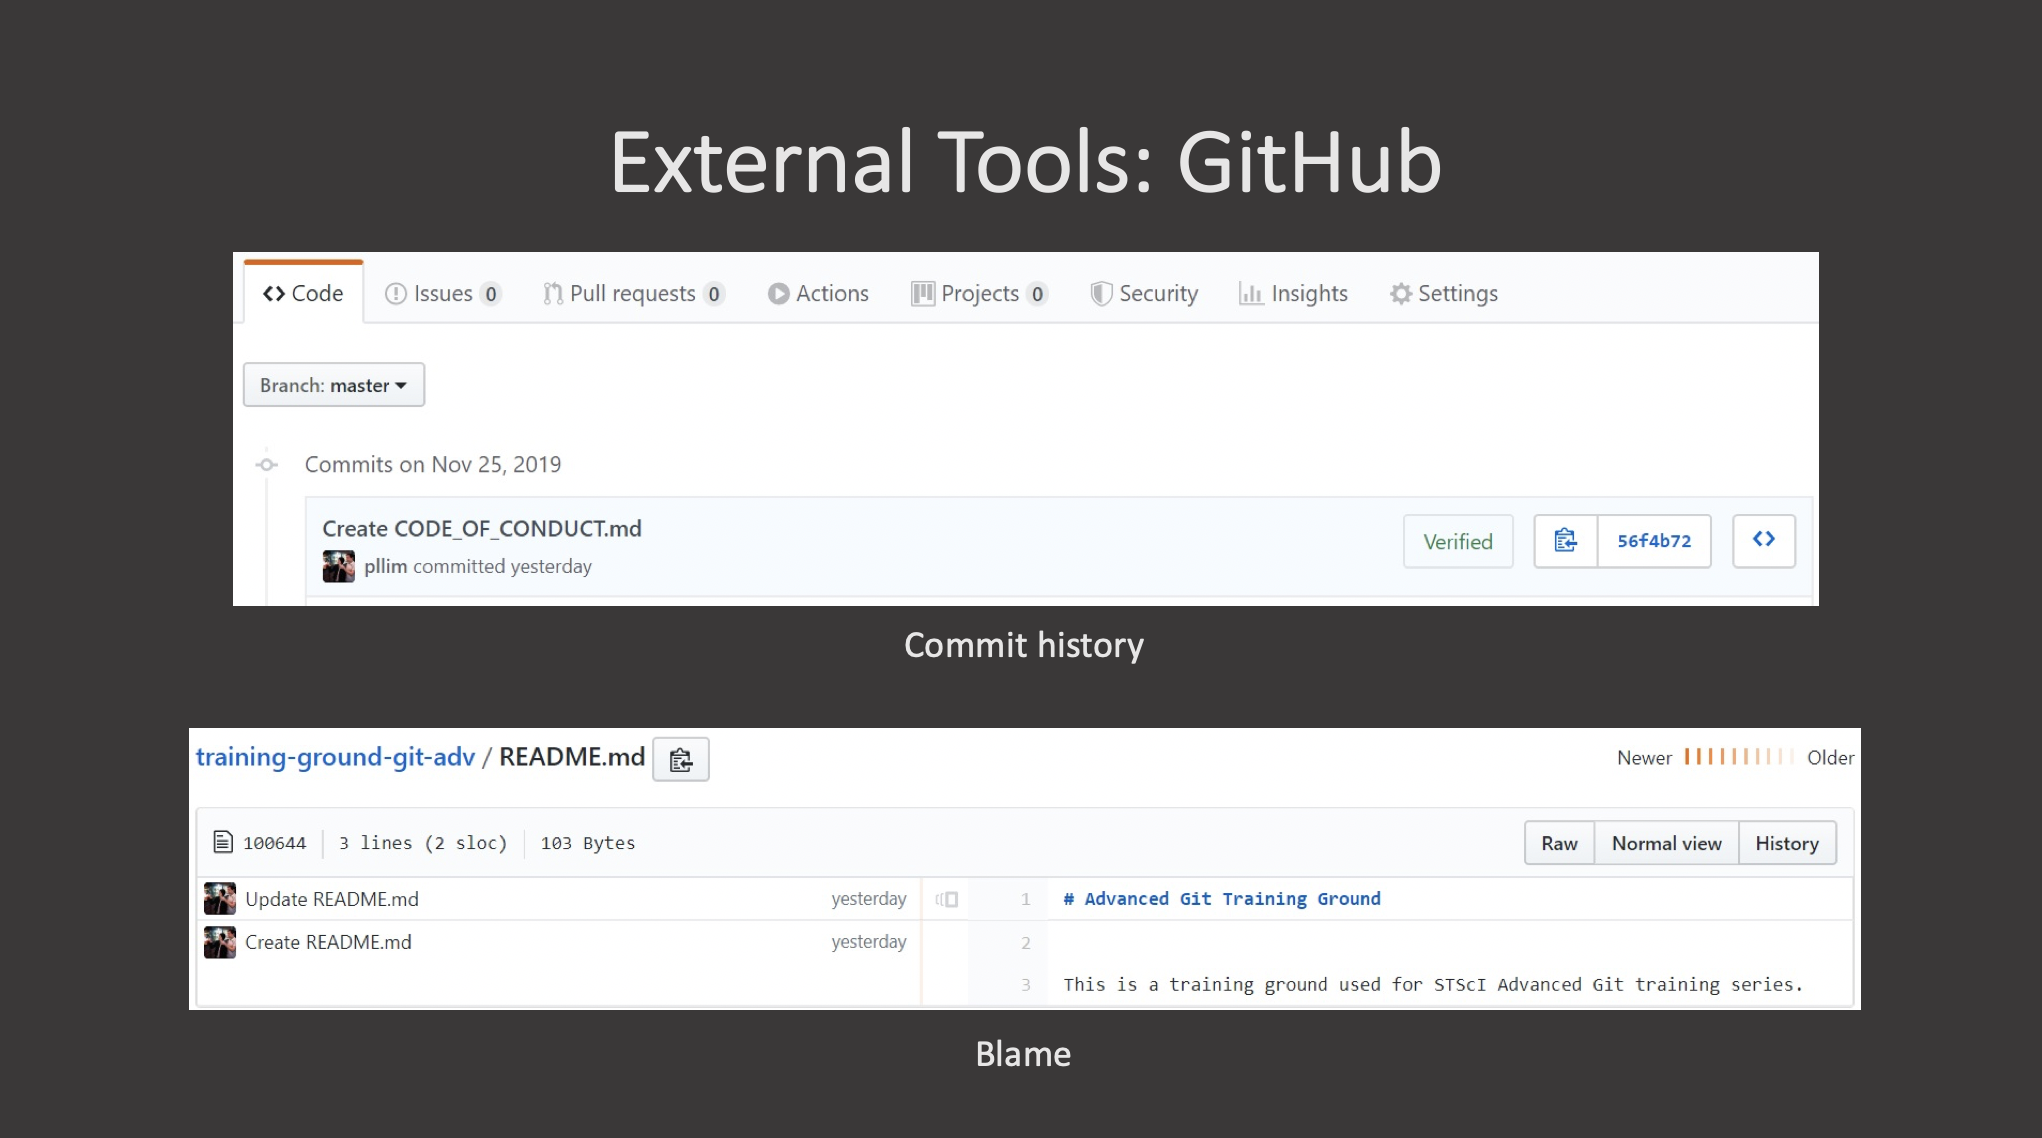
- GUIs can help with making some aspects of working with Git easier.